Pages

Showing posts with label upcycled stuff. Show all posts

Saturday, December 15, 2012

A Menu Board from a Cabinet Door

Last month I posted my first blog piece to the Eco-Etsy blog called A Thanksgiving Feast Fit for a Bird.  For those of you not familiar with Eco-Etsy, it is a group of Etsy artists who products are made with the environment in mind.  I'm happy to say that this month, and once a month from here on, I will be posting under the Green Living section of the blog.  This month's feature shows readers how to turn an old kitchen cabinet door into a menu board for the holiday table.  Here's a sneak peek:


Be sure to visit the Eco-Etsy blog for a step by step tutorial.

Tuesday, December 11, 2012

How to Make a Sweater Dress for Your Dog ... From Your Old Sweater!

Today Miss Bella is modeling a very eco-chic sweater dress that has taken a bit of a walk on the wild side.  This mint green dress was fashioned from the sleeve of an old sweater and embellished with a zebra striped ruffle.  It's the party dress that every girl needs this holiday season.  Here's how to get yours...well MAKE yours:

First gather your supplies:
  • Old Sweater
  • Something to sew with (preferably a machine)
  • Scissors 
  • Ruffle Trim

First, cut off one of the sleeves of the sweater and make two arm holes.  Cut it just like I have it pictured, the extra "tail" of fabric will be used to attach your ruffle skirt.  You'll cut your arm holes both at the same time while the sleeve is folded as it is in the first picture below.  This will ensure that your arm holes are the same size...kinda.

Then zig zag stitch over your cuts to keep the seams from unraveling.  It's not an easy feat and if you tug too much as your sweater feeds under the sewing machine foot you'll have some wonky looking armholes!!  Not that I know from experience or anything...


Now for the cutie patootie butt ruffle! Start at the bottom of your sweater dress and pinned down (then stitch) a length of ruffle into place.  Move up a bit and do another ruffle slightly overlapping the first, then another and another.  Do as many as you like, I ended on the fourth length of ruffle.


So what do you think?  Very eco-chic, adorable and simplish, right?


Totally Tutorials Blog

Tuesday, October 2, 2012

What a Fabulous Sewing Month

September was a fabulous month for sewing some upcycled goodness, wasn't it?  We had eight fabulous entries into two separate contests.  Thankfully, I didn't have to choose the winners because it was a tough one....well, two.  But in the end our two winners were:

Punky Trash Goddess from Annie

Fold 'n Go Tote from Melissa


All I have to say to my readers is that you are SO lucky that I didn't attempt to post my own projects for this month-long celebration of  sewing because, well, I just don't enjoy it.  Don't enjoy it so much that I can't even bring myself to hem a pair of curtains that separate my craft room space from the rest of the basement.  Not even after I tore the curtain rod hardware out of the wall TWICE because I stepped on all the extra fabric that was pooling up on the floor.

So last week, just as I was posting the last project, I got all tangled up in the fabric again.  I must have done a good job reinstalling the hardware last time because here's what happened this time:

So embarrassing!  But a great reminder to be grateful for all those who participated.


Tuesday, September 25, 2012

Second Chance Sewing Month Challenge #2

Looking to put a little punk in your trash?  Well look no further than this:

Annie from MontanaSolarCreations had me cracking up when I read her blog post about the project she did with the box of trash that I sent her...cracking up in a good way!  Here is what I sent Annie:


Yep, that punk rock idol is constructed of part of an egg crate, plarn (plastic bag yarn) and a little girls top.  Hop over to her blog to see how she created this punk goddess.

Wednesday, August 29, 2012

Sewing Month Challenge

September is National Sewing Month and even though every now and again I pick up a needle and thread or stomp on the sewing machine pedal, sadly, sewing has never held my interest for very long.  So what's an upcycling blogger to do  when she doesn't have the know-how to blog about all things needle and thread?  Throw it out to the readers, that's what she's to do!  So, I hope you're game for a little "Craft Wars"-like challenge.

Here's the deal, the first ten people to post below and tell me that they are up for the challenge will receive a packet of trash in the mail from my craft room...you lucky little devils!  Then it's you're job to incorporate all of the items into a craft of your choice.  You can incorporate any other materials from your own craft closets (wouldn't it be sweet if you had the Micheal's Craft closet to work with?) and it must be sewn in some fashion (by hand or with a machine).  You'll have until September 10, 2012 to send me pictures and a written summary of your project via email.  Here's were it gets good...

I'll post a blog for every project that I receive back with links back to your blog, website or Etsy shop.  All posts will be shared via Facebook, Twitter and Pinterest.  Then at the end of the month we'll give readers the chance to vote on their favorite project.  The one with the most votes gets a $100 shopping spree in the Upcycled Stuff shop.

FAIR WARNING #1:  I will take photographs of packages before they go out so no cheating and leaving things out. 

FAIR WARNING #2:  You may not receive a stitch of fabric from me....muahhahahah

So, are you game?  If so, tell me below and then send your mailing address to UpcycledStuff@yahoo.com.  Good luck everyone!


Stuff4 Sewing

Tuesday, August 28, 2012

Upcycled Pet Stuff

If you ever find yourself in Taylors, South Carolina be on the lookout for a little shop called Pet Paw-Teek.  Then swing by and say "hi" to my mom and dad.  They just opened a modest little pet shop and I'm helping to stock the shelves with a variety of upcycled pet items.  Check out some of stuff I just popped in the mail.

Kick sticks made with organic cat nip and hideous ladies pants (no joke - these REALLY were ladies pants):


I had to give up the kick sticks with huge fish all over them because....well, they kept disappearing as I made them.  I mean, would YOU tell her she couldn't have it....


T-shirt braids, kinda like those fishing pole toys


Organic catnip seeds with an Old Spoon Garden Marker


Unfortunately, I'm not close enough to give her one of my upcycled pet beds.  This one is an old Goodwill coffee table and scrap bead board and molding that I picked up on a Freecycle.  The cushion portion is patchwork of old jeans.   I was going for shabby chic...did it work?

Wednesday, August 8, 2012

How I Love a Happy Accident

For the longest time, I've cursed my beading wire every time I finished a bracelet or a necklace.  All too often I'd pull it quite tight and end up coiling the leftover wire like a piece of Christmas ribbon rendering it useless.  There is usually enough leftover for a bracelet and I typically cast it aside...until recently.  I stopped fighting it, that's a hard thing for me to do seeing as I'm a typical Scorpio and quite stubborn (er...determined!).  Anyway, here's some of the new pieces that I've made with the INTENTIONALLY coiled beading wire.  I'm actually loving this curly effect now that I've decided to go with the flow!

Newspaper Bead Necklaces
Map Paper Bead Bracelet
Newspaper Bead Bracelet


Stuff4 Crafts

Sunday, June 10, 2012

Oh What to Do Next?!

Pinterest in killing me!  So many projects, so little time and all that. There are a few projects that I've been dying to do.  Of course, I'm not looking to replicate them exactly they'll have my own little spin on them.  Here's a few of the pins that I'm recently obsessing over:


Fire Bowl from B3HD

Kids Beach Games from Martha Stewart


So Many Upcycled Lighting options on Pinterest

So where should I start?  With an upcycled version of the fire bowl using repurposed glass jars or vases? An easy to transport version of Martha's beach game suitable for car rides and that includes all the pieces for playing? Or should I try my hand at some sort of lighting?

Vote here or vote on Facebook, by week's end you'll have made my decision for me.


Saturday, June 2, 2012

My Snapple Bird Feeder Is Working!

Remember the Snapple bird feeder that I made last week?  Well, I'm happy to report that it is actually working!  Here's what I saw when I came home from work last night.  There's only a smidge of bird seed left in the bottle.


I probably wouldn't have even notice if it weren't for the giant Blue Jay sitting atop the Shepard's hook eating.  I don't know how someone that big was able to feed from it, but there he was - the very first Blue Jay that I've seen in my yard.  I was very excited!

Have you tried it yet?

Thursday, May 31, 2012

My "Simple" Bird Feeder

I thought this would be a very simple project but boy, oh boy was I wrong.  Thankfully, I can share my screwups so you can avoid them when you upcycle your very own bird feeder.  Here's my finished product:


I actually found two of those wavy plates at Goodwill and the mug at a yard sale. They were the perfect match for this project!  So here's what you'll need:

1.  Mug and a saucer
2.  Length of PVC
3.  PVC cutter
4.  Silicone adhesive
5.  PVC coupling with a threaded end
6.  PVC plug

First, you'll want to take care of the gluing. Use the silicone to glue the plate and the mug together.  Then the PVC plug - well, this needs some backstory!  I desperately wanted to put this project together without drilling holes in the bird feeder so I headed to the plumbing section of my local hardware store.  I searched high and low for a  cap that I could put on top of the PVC pole with a flat surface for gluing to the bottom of the plate.  Unfortunately, every cap in the plumbing isle had a curved surface, not ideal for attaching to the plate.  So I grab a plug that would screw into a coupling.  It sort of has a flat surface but there is a giant crevice in the plug.

After several failed attempts at attaching the plug to the plate, this is what I figured I needed to do. Screw the plug into the coupling then fill the crevice in the plug about a third or the way with silicone.  Let it dry overnight, then repeat one to two more times until you have a nice flat surface.

Then you can simply apply glue to the plug and attach it to the plate.  Let dry overnight.  Right about now, you might be wondering why we would need to fill the plug.  I just couldn't get a good grip on the dish when I applied it to the rim of the plug alone.  And I tried to fill the plug up all at once and it just wouldn't dry.  But this crazy method seems to be working.  If you can find something with a truly flat surface you can avoid all this nonsense but I didn't have a ton of luck.

Hi, Chico!
While everything is drying, cut your PVC to length and stick it into the ground.  Then you'll just need to drop the finished feeder on top of the pole once it's dried.

This method also makes for easy cleaning.  You can just pull it off the pole and bring the feeder portion to the sink.

If you figure out a better solution for the plug, please do post it below!  Enjoy!

Monday, May 28, 2012

It's Yard Sale Season

As the warmer weather arrives so do the Yard Sale signs on nearly every corner and doesn't Memorial Day Weekend seem like the official kick off?  I've been digging through the yard sale treasures for well over a month now finding all the pieces that I needed for my new line of bird baths but this weekend definitely kept me busy!  Check out a few of my yard sale finds:

I recently made Chico a new bed out of an old pillow.  He used it a few times before Destiny claimed it as her own.  So when I saw this floor pillow for a $1 I knew I had to get it to replace the one that Chico lost. The next time I pull out the sewing machine I MIGHT try to pull together a cover made out of some old jeans or something.


And no, that's not Chico.  Do you think Chance is willing to share?  I'm not so sure....

Poor Chico!

I also found this lamp.  The lampshade is a bit torn up and it is definitely not my taste.  But the lamp base is going to make for a beautiful bird bath once I find the right bowl for it.  Don't you think?


In amongst a box full of mismatched bowls and glasses, I found this beauty for a buck.


If they knew how pretty it would be with a few flowers, I'm not so sure it would have ended up in that box.

No matter how you spend your Memorial Day, yard sale or not, take a moment to remember all the sacrifices of the men and woman (and their families) who serve our country.


Thursday, May 3, 2012

Rustic Upcycled Cord Storage

The cords for all the electronic devices laying around the house are making me crazy!  I've seen some nifty ideas around the web using toilet paper rolls to store them in.  Since I often use my cords on different floors of my house, I wanted to make something that was portable.  Check out this trunk that I picked up at a yard sale:


It's a small decorative piece sitting on my shelf day to day.  But when I open it up, viola:


Cardboard tubes organize my cords and there is still room left for larger chargers that plug into the wall and for both my still and video cameras.  I took the liberty of cutting the tops of the tubes at an angle and labeling the taller edge.  They are the perfect size for a snug fit when the lid is closed making moving the case without jumbling everything up a breeze!

Tuesday, April 17, 2012

How to Turn a Candle Holder into a Table

Sound absurd?  Well I'm not talking about one of those tiny table top candle holders nor am I suggesting you turn it into a full sized dining table.  Rather a free standing floor candle holder turned into the perfectly sized side tabe. But this tutorial I will not be posting on my blog today, or any other day for that matter, you have to hop over to Buzzfeed to see how I made this magic.

Today, on Buzzfeed it's all out war - a craft war that is.  Buzzfeed Shift has pit Upcycler against Upcycler to see who could come up with something a little unexpected made out of stuff that might otherwise end up in the landfill.  It's Upcycled Stuff vs. Yummy Goods, rather candle holder turned side table vs. old yoga Tee turned refashioned bird Tee.

Here's my table that I made out of a candle holder and a bunch of coiled newspaper


Wanna see how?  Go check it on BuzzFeed and while you're there....VOTE FOR ME!!

Sunday, March 25, 2012

An Upcycled Springtime Egg

I recently received an email from a local craft store that gave me how-to instructions to make a really pretty spring time egg decoration.  Of course this wasn't just a free tutorial for the sake of a free tutorial, it was an opportunity to sell all the pieces that go into making this decoration.  The pieces that I would have had to purchase were; a wooden stand, a wooden egg and scrapbooking paper that looked like old music sheets. Well, here's the tutorial for the free UPCYCLED version. 

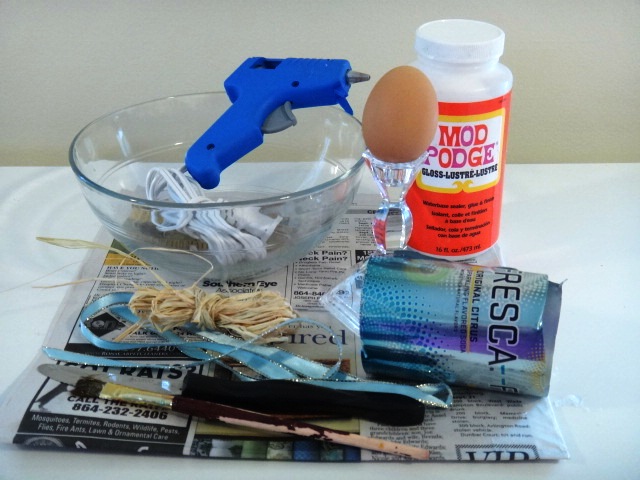
First, gather up your supplies:

Newspaper (or sheet music, magazine pages, etc.)
An egg
Old candlestick
Scrap ribbon or fabric and raffia or dried moss
A serrated knife
Mod Podge and a paint brush
Hot Glue Gun

There is no need to buy a wooden egg made from virgin materials when you have all you need sitting in your fridge.  Grab a mixing bowl, your serrated knife and an egg.  Holding the egg over you bowl, tap your egg firmly with the serrated knife to get it started .  It'll look a bit like the picture, don't worry about making it perfect since you'll be covering it with paper.  Wiggle your knife into the egg as you continue to move it around the egg.  You'll get about halfway around when it starts to give and you can just pull it open.


Run some hot water on the shell to get rid of the goo and pat dry before putting the eggshell back together again.  I tried a couple of things to get the shell back together.  I can tell you Mod Podge does NOT work.  You can see the glossy strip of dried Mod Podge going around my egg.  But hot glue seemed to do the trick.  It doesn't have to completely seal the egg, I just sealed a bit on two opposite sides to hold it together until I could apply the papier mache.

Now for the egg covering.  Why on earth would you buy brand new paper that looks like sheet music?  If you have sheet music laying around that you are no longer using then, by all means tear it up.  I didn't have any so I used newspaper.   Take a strip and apply it around the egg with Mod Podge.  Then continue to add strips around the shell until it's completely covered.  Use plenty of Mod Podge and smooth all the edges down on the egg.  Now go scramble that egg while you wait for it to dry.

Once your egg is dry, you can finish assembling the pieces.  I twisted several strands of raffia and hot glued them to the candlestick to resemble a nest.  You could also use a pinch of dried moss if you have that.  Then hot glue your egg into the nest.

To dress up the egg, use what you have.  I had a scrap piece of ribbon that was tied onto a gift (the original tag was still attached to it) that I tied around the egg with some additional strands of raffia. Then I cut a bird shape from a Fresca can and glued it to the bow.

Whadda ya think?  Still think you need to buy all that new stuff?


Friday, March 16, 2012

Featured Artist: Break the Record (and yes, another giveaway)

One of my favorite things about featuring other upcyclers on my blog is that I get the chance to see some really cool products that I wouldn't have otherwise seen.  Seriously, how cool is this night light made from old cassette tapes?


Stacey has a great Etsy shop, Break the Record, filled with fun upcycled items made from cassette tapes and records.  And this week, she's offering up this fantastic piece of functional art to one lucky reader.  Here's what Stacey had to say about herself and her upcycling!

Tell us a little about your shop and your art. 
Mix Tape Pencil Cup

Last May I began brainstorming for the perfect birthday gift for my boyfriend.  He is very hard to buy for.  He is a small business owner, but in his spare time he likes to DJ with vinyl records and also produce music.  So, I started thinking of gifts that were related to vinyl records and such.  That is when I decided to make a clock.  Within a week I had discovered a passion for making anything and everything I could out of vinyl records.  So I started looking for old scratched up no-longer-playable vinyl records and rescuing them before they were sent to rest eternally in the local landfills.  Friends encouraged me to try selling my crafts on Etsy, so I gave it a try.  After I sold my first clock to a woman who purchased it for her unborn son's retro themed nursery, I was inspired to create something out of the other retro music memorabilia like the cassette tape.  And since I was picturing a baby nursery, my first idea was a night light.  Now my MixTape Lights make up almost fifty percent of my Etsy shop.  

Who are the important folks/critters in your life?  

The two most important blessings in my life are my two little girls, Lexi and Jayden.  They inspire me every minute of every day.  As a single mommy I was actually job hunting for a second job when I decided to start my Etsy shop.  I had a hard time because I refused to work a job that would take time away from my babies.  I am so thankful that I started Break The Record because, although it may not be an "I quit my day job" story, it is a personal financial survival story that has made a significant impact on my family's life.  My daughters are very happy to be able to go skating or to see a movie on the weekend.  They say "Thank you, Mommy!" and I tell them "Thank Etsy!  Mommy got a sale this week."

When did you start playing with trash?  

The first time I "played with trash" was when I started cutting up old T-shirts and "making them cool."  I wanted a cool shirt to wear to a concert so I took an old band T-shirt and did a little slashing, slicing, and redesigning and whipped up a totally rockin' and unique halter top that was way more flattering for a young concert gal than a old boring man sized Tshirt.  

Where do you take your inspiration from?   
Vinyl Mail Sorter
My crafts are inspired by music and my love for it.  I spent my entire childhood watching MTV all day long.  I was never into cartoons or other things that kids my age were watching.  I was completely addicted to music videos.  To this very day I still turn on the television and go straight to one of the music channels.   My life inspiration and drive is inspired by my children and wanting to always be able to provide them with what they need, rather it be a new pair of tennis shoes for cheerleading tryouts, a mommy-made puppy costume, help with a science fair or art fair project, advice, encouragement, or a big hug.  

What other passions do you have in life?

There is one particular cause that is very close to my heart, and that is supporting the cure for breast cancer.  A portion of all proceeds at Break The Record are donated to numerous breast cancer charities.  My mother was diagnosed nearly 15 years ago.   She went thru surgery, chemotherapy, and radiation.  It took a toll on her body, but with lots of hope and many prayers, thankfully she did beat it.  My daughter and I are volunteering at the Breast Cancer 3 Day Walk to show our support for finding a cure.  I will soon be launching a line of PINK MixTape Lights in which 100% of the proceeds will be donated to the cause.  My other passions in life are all my goals for the future.  I want to own my own clothing shop someday.  I've wanted to be a fashion designer since I was a little girl.  I hope to eventually open up my own clothing boutique  here in my hometown.  

What do you want readers to know about you or your art?  

Wedding Table Lighted Centerpiece
I love having my own Etsy shop, but I do find it very hard to balance running my shop, caring for my children, and working my full-time job at the State Prosecutor's office, where I have worked for the past 17 years.  Creating items for Break The Record is so much fun to me.  I love being crafty and I love music.  Combining two of my favorite things and creating really fun unique items is like my own personal form of yoga.  After my kids are in bed at night I get out all my supplies, relax and start crafting.  

Time to enter to win that really cool mix tape night light.  You know the drill, be sure to enter one comment for each action that you take below.  On Thursday, March 22, Random.org will determine the winning number!  Now get busy tweeting, sharing and commenting (and be sure you leave some way for me to contact you in case you are the winner):

1.  Visit Break the Record and tell us your favorite item below
2.  Tweet this post and be sure to include @iBreakTheRecord
3.  Follow Break the Record on Facebook
Related Posts Plugin for WordPress, Blogger...