Pages

Showing posts with label upcycled clothes. Show all posts

Tuesday, December 9, 2014

DIY Felted Sweater Snowman Ornament: Day 10 of 12

I've used up some more of that felted sweater from the Christmas balls that I made  several days ago for today's ornament.  I wanted to make this cute little Felted Sweater Snowman Ornament completely NO-SEW, and I did!  Check it out the cuteness:


Don't forget to enter to win this and all of the ornaments in this series withe Rafflecopter below:

a Rafflecopter giveaway

And just in case you missed any of the past ornament tutorials in this series:
Pallet Picture Frame Ornament

Monday, December 1, 2014

DIY Sweater Ball Christmas Ornament: Day 4 of 12

I have a really simple and elegant Christmas ornament for you today.  I made this one from a felted wool sweater with a coffee stain that I found at a thrift store.  I'm pretty sure more than a few of you have accidentally shrunk a wool sweater before...I hope you didn't throw it out because it will be perfect for this fourth project of the Twelve Days of Upcycled Christmas Ornaments.


You can find the video tutorial for this Felted Sweater Ornament here.

While you're here, don't forget to share this tutorial and enter to win all of the ornaments that I'm making during this holiday event.  Here's the Raffecopter for today's post:

a Rafflecopter giveaway

...and if you missed any of the other ornament tutorials, you can check them out here:
Aluminum Can Ball Ornaments
T-shirt Yarn Candy Canes
Scrappy Denim Dove

Sunday, November 30, 2014

DIY Denim Bird Ornament: Day 3 of 12

It's Day 3 of the 12 Days of Upcycled Christmas Ornaments and today I'm showing you how you can make a shabby chic ornament in any design you can imagine from a pair of jeans.  In this case I'll be making a dove.


Remember this is also part of the 5K subscriber giveaway over on my YouTube channel. Here's the Rafflecopter for this project:

a Rafflecopter giveaway
Be sure to check out the last two upcycled projects:
Aluminum Can Ball Ornaments
T-shirt Yarn Candy Canes

Thursday, October 16, 2014

How to Make a Reusable Trick or Treat Bag

I love a good (and EASY) T-shirt upcycle and this one is exactly that!  If you've got ten minutes and a quarter, you too can make a fabulous trick or treat bag that is kinder and gentler on the earth.  Not to mention a major upgrade from the pillowcase that I used to use as a kid!


Whilst shopping at my local Goodwill Clearance Center, I started to run across super cute Halloween kids shirts....all throughout the year.  And I ended up with a stack of 'em.  For this project, I used just one from my stack along with a pair of scissors and a sewing machine.  If you have a little one just learning to sew, this is an excellent project!

If you'd like to see a brief video demonstration, you can check that out here...it's less than two minutes! Or you can follow these simple steps:

1.  Cut both of the sleeves and the collar of the shirt away.
2. Turn your T-shirt inside out and use the bottom hem as a guide to sew a straight line across the bottom opening of the shirt.
3.  Turn your bag right side out and DONE!

It really is that easy.  And what a great way to balance out the waste of all those candy wrappers!


Tuesday, September 2, 2014

My Little DIY Coaster and Hot Plate made from Denim Hems

Now that Labor Day is behind us, it's time to start thinking about fuzzy sweaters, cozy fires and warm casseroles.  Right? Well, I'm definitely not there yet.  But I did make a pretty nifty hot plate for all of those casseroles that are sure to grace the dinner table sooner or later.  I made this one out of the hems of blue jeans:


Of course the idea came to me while I was making a coaster in the same fashion for all of the tall, icy glasses of sweet tea yet to be had during these final days of summer.  Have you seen these floating around the web?  I love them and figured I needed to give them a whirl.


Of course, there is a video...a two-for-one deal as both tutorials are rolled into one video.  You can see that video here. If you'd rather save a click, here are the instructions (lots more detail, tips and tricks in the video):

1. Remove all the double stitched seams from a pair of jeans.  The coaster above used two pant leg seams and one from the seat of the jeans.
2. Spreading a bead of E-6000 along the inside of the seam start coiling the seam around and around. Add as many seams as you need to achieve the desired size.
3. When you get to the end, clamp the end with a binder clip to keep the coil end in place while the glue dries - give it about an hour or two.
4. Remove the binder clip and you have a completed coaster. And now for the hot plate...

5. Continue making coils of different sizes.
6. Arrange your circles on a piece of denim from the blue jean leg.
7. Glue (with E-600 - do NOT use hot glue for your hot plate) the circles to the piece of denim and to all adjacent coils...be liberal with the glue.
8. Let dry for 24-48 hours.
9. Serve a casserole on your fabulously upcycled hot plate.

Easy, right?  And what a great way to use all the pieces of a pair of blue jeans so that nothing goes to waste!

Sunday, August 24, 2014

A Quick and Easy Pillow Slip Cover

Show of hands...who has ever tossed a pillow because it had a stain or because it just didn't match your decor anymore?  Well, what if I told you that there was a way that you could EASILY recover those pillows and make them match any decor?  There is a way and I'm going to show you how.  Let me reiterate - these are easy to make.  If you know me, you know sewing isn't a ton of fun for me and if I have to sew more than a few straight lines I won't even attempt it.  So without further ado....


I made my slip cover out of jeans that I picked up at a thrift store.  But you could use any piece of fabric that matches your decor.  Try using thrift store finds like sheets, curtains and clothing for a unique look on your pillows.

Sunday, August 17, 2014

Easy Peasy Tie Cuff Bracelet

I love easy jewelry making projects!  Today I'll show you how to make a cuff bracelet from a thrift store tie and an old button with little more than a glue gun.  Yep, that's right....no jewelry tools are required.  Here are a few that I've made:


You'll need a few supplies that you're likely to have in your crafting arsenal already:

- Glue; both hot glue and E6000®
- Small scrap of felt
- A button, piece of broken jewelry or some other embellishment of your choosing
- A cuff bracelet blank
- Several binder clips (AKA: alligator clips)
- And....a tie, silk or otherwise

Of course there is a video tutorial for this one that you'll want to watch for all the little tips and tricks.  But in a nutshell, here's how I made these bracelets:

1. Cut your tie so the it completely covers the front of your bracelet blank with enough extra to fold over the edges.  It is best if it does not completely cover the back.
2. Use a bit of hot glue along the edges on the back to tack your tie into place.
3. Cut a piece of felt big enough to cover all of the rough edges that you just hot glued into place but small enough that it's not visible from the front of the bracelet.  Use E-6000 to glue it into place.
4.  Use your binder clips to hold the felt in place while it dries.
5.  Glue your embellishment (with E-6000) into place on the front of the bracelet and clip it into place with another binder clip.
6.  Let everything dry for an hour and remove your clips.  And, viola! Your cuff tie bracelet is done!

Sunday, March 9, 2014

A St. Paddy's Day Craft for You and the Kids

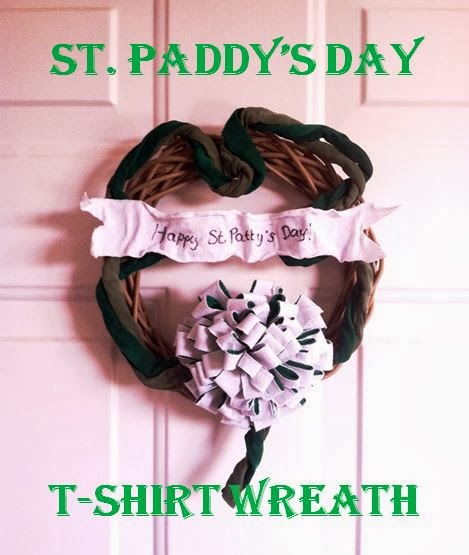
So, I found a fairly lack-luster country style wreath in the thrift store for a dollar.  Definitely not my style and in desperate need of an update.
So, I grabbed a can of spray paint and a couple of T-shirts.  Here's what I came up with:


Did you catch the spelling error? You know how it is when you spend the better part of a weekend working on a project, shooting video for a tutorial and then go through the editing process only to realize that you made a spelling error on the actual project that you can't fix it without starting all over?  Yeah, that was my weekend so I decided to just live with it. 

I love this project for kids, but that doesn't mean you can't enjoy it too.  To make a similar wreath, you'll need to know how to make T-shirt yarn and T-shirt flowers.   You can find instructions for both projects on my YouTube Channel. The Shamrock shape and banner were also made from T-shirt but I used a bit of fabric stiffener to shape them.  Be sure to check out the video for all the step-by-step instructions.


Monday, March 3, 2014

How to Make a Drawstring Pouch from a T-shirt Sleeve

Happy National Craft Month!! Who's ready for another T-shirt craft?  These are simplest bags (pouches) you'll ever make and they are made from thrifted T-shirt sleeves.  I make them by the boat-load and use them to package up shoppers purchases when I'm working an Art Festival or Farmer's Market. But you can certainly make just one for that something special that you need to wrap.  You will need a sewing machine and scissors but everything is constructed from T-shirts.  Come see how I make these over on YouTube.


Thursday, February 27, 2014

How to Make a 3D Fringed Flower from a T-shirt

I love these 3D flowers made from thrifted T-shirts and I'm going to show you how easy it is to make them!

First, a confession.  I saw someone do a fringed T-shirt flower tutorial a few weeks ago and took a mental note so I could go back and give it a try.  And when I lost that mental note and couldn't find the original tutorial, I tried to do it myself. Needless to say, this is not what her flowers looked like.  They were a great deal flatter and I'd still like to give it a try. So, if you know the tutorial I'm talking about PLEASE leave a link in the comments.

I made a quick little video tutorial to show you how I made these flowers.  You can find it here.  So gather up your supplies; an old T-shirt, fabric glue and a pair of scissors and join me.  And stay tuned because I have an idea or two for using these flowers in other projects.

Sunday, February 2, 2014

What You SHOULD Be Upcycling: T-shirts

ELEVEN MILLION TONS OF CLOTHING END UP IN LANDFILLS EACH YEAR! Are you as mortified as I am?  And did you know that two billion T-shirts are sold annually around the world?  Ladies, I think it's time we let the men keep their T-shirts...no matter how many they own.  

There is an interesting history to the T-shirt and it turns out that my favorite movie of all time, The Wizard of Oz, plays a hefty hand in it. While the word T-shirt became an official American-English word when it made its debut in the Merriam-Webster Dictionary in 1920, it was in 1939 when the first promotional T-shirt made its debut, for the Wizard of Oz.  Its popularity as a outer-wear garment, however, didn't catch on until Marlon Brando wore one in A Streetcar Named Desire in the 1950s.  And now....we're at 2 billion annually!

That 2 billion T-shirts translates to 800 billion gallons of water each year...just to grow the cotton required to make them.  JUST FOR T-SHIRTS, nevermind the jeans that you're going to wear with them!  As an avid thrifter, I can tell you that we waste so many resources on nonsense T-shirts.  Yes, I said nonsense!  Let me ask you, have ever had a large family reunion or company retreat and been given a T-shirt to wear for the day?  I see them all the time at the thrift store and they are not cute, not something that you'll ever wear again. 

T-shirts have quickly (and sadly) become disposable in our society.  So, I'm on a mission.  A mission to free the landfills of the world of the perfectly usable textiles that are smothering them.  And I'm going after the T-shirt (to start with)!  So raid your hubbies closet (or yours) or head out to the thrift store and snatch up some of those beauties and let's get started.

You've heard of T-shirt Yarn, right?  Well, if not, I've whipped up a little T-shirt Yarn Video Tutorial to show you how quick and easy it is to make.  And I've been hard at work developing new craft projects that will allow you to use T-shirt Yarn while never picking up a crochet hook or knitting needle. I just posted my first project and hope you'll check out my Finger Knit, Beaded T-shirt Yarn Bracelets.  


Be sure to subscribe to my YouTube channel while you're there so you don't miss a single project.


Wednesday, January 16, 2013

How to Upcycle Your Clothes into a Yo Yo Flower

Have you ever made a Yo Yo?  Who doesn't love that singular gathered round piece of scrap fabric that crafters have used in making quilts, handbags, jewelry and so much more?  The ease with which one can make these is surprising.  I popped a few of these flowers together using some old clothes/fabric scraps, vintage buttons and Starbucks straws.  I especially love the ones made from blue jeans.


Want to see how I did it?  Check out my latest YouTube video.  Not only do I show you how but you'll be treated to the chainsaw music that Chico plays while he sleeps...apparently, I'm not as entertaining as I thought.

Wednesday, January 9, 2013

Monthly Eco Etsy Post: How to Make a Denim Bag

It's time again for my monthly Eco Etsy blog post.  Be sure to swing by and see how you can turn an ordinary pair of jeans into a fabulous little tote...oh yeah, it's super simple!  I think super simple is going to be my theme this year!


Tuesday, September 25, 2012

Second Chance Sewing Month Challenge #2

Looking to put a little punk in your trash?  Well look no further than this:

Annie from MontanaSolarCreations had me cracking up when I read her blog post about the project she did with the box of trash that I sent her...cracking up in a good way!  Here is what I sent Annie:


Yep, that punk rock idol is constructed of part of an egg crate, plarn (plastic bag yarn) and a little girls top.  Hop over to her blog to see how she created this punk goddess.
Related Posts Plugin for WordPress, Blogger...