Pages

Showing posts with label kids crafts. Show all posts

Sunday, March 9, 2014

A St. Paddy's Day Craft for You and the Kids

So, I found a fairly lack-luster country style wreath in the thrift store for a dollar.  Definitely not my style and in desperate need of an update.
So, I grabbed a can of spray paint and a couple of T-shirts.  Here's what I came up with:


Did you catch the spelling error? You know how it is when you spend the better part of a weekend working on a project, shooting video for a tutorial and then go through the editing process only to realize that you made a spelling error on the actual project that you can't fix it without starting all over?  Yeah, that was my weekend so I decided to just live with it. 

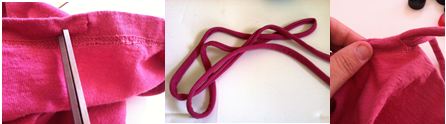
I love this project for kids, but that doesn't mean you can't enjoy it too.  To make a similar wreath, you'll need to know how to make T-shirt yarn and T-shirt flowers.   You can find instructions for both projects on my YouTube Channel. The Shamrock shape and banner were also made from T-shirt but I used a bit of fabric stiffener to shape them.  Be sure to check out the video for all the step-by-step instructions.


Friday, September 21, 2012

Sewing Month Challenge #5

The final project in the first round of Sewing Month Challenges comes from Genie at the Verdant Violet.  I sent her a thrifted pair of leggings that were a bit pilled, the core from a roll of packing tape and a handful of plastic rings from soda/water bottles. 
And look at what she transformed this pile of whatnots into:
Super cute puppets, right?  I'll let her explain her process:  "I am excited to introduce you to monster puppets Mort and Millie and their 5 monster finger puppets, Max, Mimi, Baby Merv, Manny, and Linda. Poor Linda has two eyes. Mort is multifunctional as he is both a puppet and a drawstring bag that can be used to hide the rest of his family. 
I used the cardboard tape roll as the base for Millie and the plastic rings as bases for the little guys. This allows them to stand on their own if they choose, which is great for their self-esteem. It also makes Millie feel like a bracelet."  

Well, I think I did a pretty a good job selecting just the right pieces of trash to send off to challenge participants!  What do you think?  I know, I know, I really can't take any credit for the awesome projects that have graced the pages of my blog in the last couple of weeks.  So now you have a choice to make.  Which was your favorite project?  Just vote below for your favorite:

Fold 'n Go Tote made from a pillowcase 

Comic Book Garland
Sunflower Puncher
Map Adorned Photoboard
Family of Monster Puppets

Remember, bragging rights and a $100 Upcycled Stuff shopping spree are up for grabs so challengers...call your friends and family and not-so-loved-ones and send them over to vote for you!  Winner will be announced on Tuesday, September 25 at 6:00 EST!


And tune in all next week for a second chance challenge where upcyclers will compete to win a $50 shopping spree.  That'll round out National Sewing Month nicely (or should I say, National Tricia Doesn't Have to Come Up With a Bit of Original Content Month). 

Good luck everyone and thanks for playing along!  


*TO VOTE:  Register your favorite project in the comments below...one vote per person :)


Stuff4 Sewing

Monday, August 27, 2012

Upcycled Games on the Go

This is it, the last unofficial week of summer!  Are you ready for it to be over?  Hopefully you're planning one last get away this holiday weekend.  And if that includes a trip with the kids you'll likely be packing a few activities to keep them busy.  Here's an upcycled version of travel game that I recently pinned from Martha Stewart:


You'll need a T-shirt, ruler, scissors, fabric markers, safety pin, sewing machine and at least 24 bottle caps in two colors.


Lets get started!  First cut a T-shirt bottom off just below the armpit.  You may want to adjust where you make that cut depending on the T-shirt size, I'm using a ladies size Large.  Then cut off a strip about an inch wide from the armpit side (keep the hem in tact) and set it aside.


Flip your T-shirt inside out and sew a seam across the cut portion creating a bag.  Then cut two small slits in the T-shirts original hem.  Grab the 1" strip that you previously set aside, cut side hem off if there is one and then tug the piece from end to end to make a piece of yarn.  Use a safety pin to thread the yarn through the hem.


Turn your bag right side out and flatten it out on your work surface.  Using your ruler and a fabric marker it's time to mark out your checkerboard pattern, which is 8 squares by 8 squares.  I made mine 1" X 1" squares but think that 1 1/2" X 1 1/2" would have been been better. Once you've decided how large you need to make your board start drawing your lines...mine were 8" long. As your boxes are formed you can start coloring in  every other box.


You're checkerboard is done.  To double the fun, flip the pouch over and sketch out a couple of tic tac toe boards.


Finally toss your bottle caps (a minimum of 12 of each color) in the pouch and off you go.  


BookingBuddy.com

Wednesday, October 26, 2011

Wordless Wednesday Featuring an Upcycled Surprise

My nine year old niece visited this weekend and brought with her and upcycled bird feeder that she very proud of.  I dare say I might have rubbed off on her a bit since the whole playing with trash is kinda "my thing" in the family.


While the engineering may not be an exact science on this one, the creativity is pretty awesome.  In her mind, when the bird lands on the spoon it acts as a funnel initiating a pour response filling the spoon with seed!  Cute, huh?


Related Posts Plugin for WordPress, Blogger...