Pages

Showing posts with label tshirt. Show all posts

Sunday, October 19, 2014

Three Upcycled Dog Toys Made From T-shirts

Have you all met my puppy, Cooper, yet?  Most of you will have met Chico, my ancient Chihuahua, if you haven't seen him in my YouTube videos then you've surely heard him snoring in the background. I love him to death but he's never been one to play much.  Although to be fair, I adopted him at ten years old!  Anyway, here's my Cooper:


He seems so little in this picture at the dog park.  And it was taken just a couple of months ago.  Last week I caught him trying to fit in the bottom cube of this cubby in the bathroom.  He used to fit so nicely in there.  Now...not so much!


At ten months old, he still has a ton of puppy left in him and he is constantly needing to be entertained.  Otherwise, well, he'll find ways to stay entertained.  And typically, he and I don't see eye to eye on appropriate entertainment methods.  So that my friends, brings me to the purpose of this post.


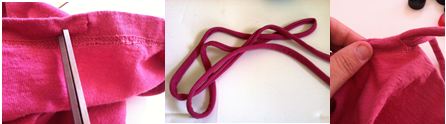
The number of chew toys that I've had to purchase in the last few months is enough to break the piggy bank for sure.  Coming up with some cheaper (and greener) alternatives was a must!  My Cooper loves all three of these toys and each was made with little more than a T-shirt and a pair of scissors. I know you're wondering so let me tell you...YES, there is a video tutorial. It's a long one, but I do show you how to make all three toys in one video.  And if you hang in until the "bitter end" you'll be treated to a glimpse of my cutie patootie playing with one of his T-shirt toys.

What other ideas do you have for DIY dog toys?  I am ALL EARS!!

Thursday, October 16, 2014

How to Make a Reusable Trick or Treat Bag

I love a good (and EASY) T-shirt upcycle and this one is exactly that!  If you've got ten minutes and a quarter, you too can make a fabulous trick or treat bag that is kinder and gentler on the earth.  Not to mention a major upgrade from the pillowcase that I used to use as a kid!


Whilst shopping at my local Goodwill Clearance Center, I started to run across super cute Halloween kids shirts....all throughout the year.  And I ended up with a stack of 'em.  For this project, I used just one from my stack along with a pair of scissors and a sewing machine.  If you have a little one just learning to sew, this is an excellent project!

If you'd like to see a brief video demonstration, you can check that out here...it's less than two minutes! Or you can follow these simple steps:

1.  Cut both of the sleeves and the collar of the shirt away.
2. Turn your T-shirt inside out and use the bottom hem as a guide to sew a straight line across the bottom opening of the shirt.
3.  Turn your bag right side out and DONE!

It really is that easy.  And what a great way to balance out the waste of all those candy wrappers!


Monday, August 27, 2012

Upcycled Games on the Go

This is it, the last unofficial week of summer!  Are you ready for it to be over?  Hopefully you're planning one last get away this holiday weekend.  And if that includes a trip with the kids you'll likely be packing a few activities to keep them busy.  Here's an upcycled version of travel game that I recently pinned from Martha Stewart:


You'll need a T-shirt, ruler, scissors, fabric markers, safety pin, sewing machine and at least 24 bottle caps in two colors.


Lets get started!  First cut a T-shirt bottom off just below the armpit.  You may want to adjust where you make that cut depending on the T-shirt size, I'm using a ladies size Large.  Then cut off a strip about an inch wide from the armpit side (keep the hem in tact) and set it aside.


Flip your T-shirt inside out and sew a seam across the cut portion creating a bag.  Then cut two small slits in the T-shirts original hem.  Grab the 1" strip that you previously set aside, cut side hem off if there is one and then tug the piece from end to end to make a piece of yarn.  Use a safety pin to thread the yarn through the hem.


Turn your bag right side out and flatten it out on your work surface.  Using your ruler and a fabric marker it's time to mark out your checkerboard pattern, which is 8 squares by 8 squares.  I made mine 1" X 1" squares but think that 1 1/2" X 1 1/2" would have been been better. Once you've decided how large you need to make your board start drawing your lines...mine were 8" long. As your boxes are formed you can start coloring in  every other box.


You're checkerboard is done.  To double the fun, flip the pouch over and sketch out a couple of tic tac toe boards.


Finally toss your bottle caps (a minimum of 12 of each color) in the pouch and off you go.  


BookingBuddy.com

Sunday, November 27, 2011

The Weekend Wrapup that Includes a Little Extra Gift

I'm really getting a lot of use from packing material this holiday season and we'll utilize more of it today along with a few other things from around the house to make this beautifully wrapped holiday gift!


You'll need packing paper, an old T-shirt, an aluminum can, a hole punch, an alligator style hair clip (the only thing you'll need to buy) and something to cut your can with.

There are a few handmade components to this gift wrap, so first we'll make a gift tag out of a beverage can.  After you've cut and cleaned your can you can either use your favorite die cut machine to cut the gift tag of your choice or cut one out with a pair scissors.  Then just use a hole punch make a hole near the top of your tag and add a tiny scrap of t-shirt ribbon.  You can use a sharpie to mark the back side of your gift tag.


Once you've wrapped your gift, you'll need to cut a few strips of your t-shirt to make a ribbon long enough to tie around your gift.  If you need a little help making the ribbon, I put together a YouTube video to show you how or you can just pick some up in my Etsy shop.   Okay, wrap your ribbon around the gift.


Now for the final touch, the reusable embellishment - the little extra gift.  Cut another strip of t-shirt that's about 2" wide and a circle that is about 2" in diameter (you can adjust this to other sizes depending on the size of your gift).  Follow the instructions in this tutorial that I found online to make a fabric rosette out of your t-shirt material:


Use a little hot glue to attach an alligator clip to the back side of the rosette.  You'll want to pinch your alligator clip open while you press it into place, otherwise you'll end up glueing the whole thing shut...learn from MY experiences people!


Tie the gift tag to your gift and then clip on to the t-shirt rosette.


Once your gift recipient has unwrapped their gift they still have a beautiful rosette that they can use in the their hair clipped to a headband, clipped to a handbag or even on a jacket lapel. And yes, you can just pick up these fabric flowers in my Etsy shop as well.


Happy Wrapping!
Related Posts Plugin for WordPress, Blogger...