Pages

Thursday, May 31, 2012

My "Simple" Bird Feeder

I thought this would be a very simple project but boy, oh boy was I wrong.  Thankfully, I can share my screwups so you can avoid them when you upcycle your very own bird feeder.  Here's my finished product:


I actually found two of those wavy plates at Goodwill and the mug at a yard sale. They were the perfect match for this project!  So here's what you'll need:

1.  Mug and a saucer
2.  Length of PVC
3.  PVC cutter
4.  Silicone adhesive
5.  PVC coupling with a threaded end
6.  PVC plug

First, you'll want to take care of the gluing. Use the silicone to glue the plate and the mug together.  Then the PVC plug - well, this needs some backstory!  I desperately wanted to put this project together without drilling holes in the bird feeder so I headed to the plumbing section of my local hardware store.  I searched high and low for a  cap that I could put on top of the PVC pole with a flat surface for gluing to the bottom of the plate.  Unfortunately, every cap in the plumbing isle had a curved surface, not ideal for attaching to the plate.  So I grab a plug that would screw into a coupling.  It sort of has a flat surface but there is a giant crevice in the plug.

After several failed attempts at attaching the plug to the plate, this is what I figured I needed to do. Screw the plug into the coupling then fill the crevice in the plug about a third or the way with silicone.  Let it dry overnight, then repeat one to two more times until you have a nice flat surface.

Then you can simply apply glue to the plug and attach it to the plate.  Let dry overnight.  Right about now, you might be wondering why we would need to fill the plug.  I just couldn't get a good grip on the dish when I applied it to the rim of the plug alone.  And I tried to fill the plug up all at once and it just wouldn't dry.  But this crazy method seems to be working.  If you can find something with a truly flat surface you can avoid all this nonsense but I didn't have a ton of luck.

Hi, Chico!
While everything is drying, cut your PVC to length and stick it into the ground.  Then you'll just need to drop the finished feeder on top of the pole once it's dried.

This method also makes for easy cleaning.  You can just pull it off the pole and bring the feeder portion to the sink.

If you figure out a better solution for the plug, please do post it below!  Enjoy!

Tuesday, May 29, 2012

The Anatomy of a Teabag

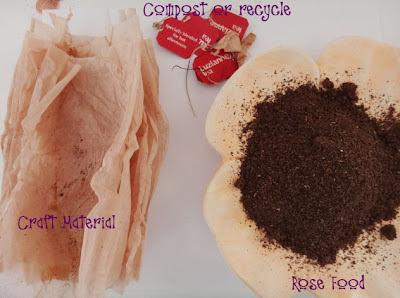
With summer only a few weeks away, of course you're thinking icy cold beverages.  Maybe a tall glass of sweet tea in the South or sun brewed tea in the North?  Before you toss those used tea bags in trash, consider this:


You can compost the tags and strings, it's all organic matter.  And, just as coffee grounds feed your roses and other garden inhabitants so do tea leaves.  Sprinkle used leaves around plants or just toss 'em in the compost bin along with the tags.

And how about those beautifully tea stained tea bags?  Craft material, of course!  Check out how I made these flowers:


So what's left for the trash?  That little staple, that's it!  Now go grab a tall icy cold glass of tea and enjoy the season!

Monday, May 28, 2012

It's Yard Sale Season

As the warmer weather arrives so do the Yard Sale signs on nearly every corner and doesn't Memorial Day Weekend seem like the official kick off?  I've been digging through the yard sale treasures for well over a month now finding all the pieces that I needed for my new line of bird baths but this weekend definitely kept me busy!  Check out a few of my yard sale finds:

I recently made Chico a new bed out of an old pillow.  He used it a few times before Destiny claimed it as her own.  So when I saw this floor pillow for a $1 I knew I had to get it to replace the one that Chico lost. The next time I pull out the sewing machine I MIGHT try to pull together a cover made out of some old jeans or something.


And no, that's not Chico.  Do you think Chance is willing to share?  I'm not so sure....

Poor Chico!

I also found this lamp.  The lampshade is a bit torn up and it is definitely not my taste.  But the lamp base is going to make for a beautiful bird bath once I find the right bowl for it.  Don't you think?


In amongst a box full of mismatched bowls and glasses, I found this beauty for a buck.


If they knew how pretty it would be with a few flowers, I'm not so sure it would have ended up in that box.

No matter how you spend your Memorial Day, yard sale or not, take a moment to remember all the sacrifices of the men and woman (and their families) who serve our country.


Friday, May 25, 2012

A Long Overdue Trip to the Aquarium

So I visited the aquarium yesterday.  It was a lovely aquarium, lots of conservation messaging, beautiful exhibits and great opportunities for interaction. Although this sign really perplexed me. 


Respect the fish - catch and release when possible.  Hmmm, now I'm all for catch and release when the fish is a threatened species, too small to be removed from the wild or preggers.  But it seems that catching and releasing "when possible" is more like something you would do for the fun of it.  If someone stabbed me with a hook and pulled it out again then let me go, I don't think that would be the most respectful thing they could do for me.  I don't know, maybe it's just me.

Anyway, I did take more pictures and I really did enjoy my visit.  With that, here are some frogs for you to enjoy.

Peek-a-boo


How about this cutie pie!


 And what's an aquarium without a mob of desert dwelling meerkats? ;)


Who's your favorite aquarium dweller?

Wednesday, May 23, 2012

My Snapple Bird Feeder

Have you seen those bird feeders using glass bottles in a wooden frame attached to the house?  I've seen a couple but I really wanted a hanging version, so I made this bird feeder:


I think it needs a bit of design work but the concept is ready to share, you might to grab a cup of coffee, this is a long one.  Here's what you'll need to make your very own upcycled bird feeder:

1. A glass bottle with lid, you'll want a bottle with a larger opening so the seed will fit through.
2. The bottom of a 2 liter soda bottle
3. Craft wire
4. Galvanized Steel Wire
5. Drill, maybe.  If you can start the hole in the lid with a nail and hammer you can use a good pair of scissors to widen the hole
6.  Scissors...oh yeah, you'll need a blow dryer too.

The first thing you'll want to do is set up the cup portion of the feeder.  Cut around the bottom of the soda bottle to give you the shape of the flower.  Be careful not to cut too low between the "petals" or you'll end up with a leaky cup.

To help the birds latch on you'll need to make a sort of ledge on the petals.  Nothing fancy, just flip your bottle bottom over so the petal tips are on the table and use your blow dryer heat the edges.  As you do, apply a little pressure to guide the shape. This will help the edges bend over instead of just giving you a way appearance.    This doesn't take very long so be sure to keep an eye on it.


Now we need to attach this to the lid, so drill a hole in the lid and use a pair of scissors to widen the hole.  It needs to be pretty wide to fit the seed through (I had to widen the hole in the picture) but not so wide that steel loop falls out.

Now grab a length of galvanized steel wire, 12-15" long should do it.   Take one end and form a loop that is just slightly smaller than the caps diameter.  Then make a 90 degree angle in the wire at a spot that will allow the wire to pass through the center of the hole in the lid.
You'll repeat a similar process to attach the feeding bowl.  First poke a hole in the center of the soda bottle bottom and insert the steel wire. Form a loop that will support the bowl.  Make any adjustments that you need to make so that the bowl lies flat on the galvanized wire.  When determining how long to make the piece of wire between the lid and the bowl, keep in mind that the lid should be inside the bowl to control the flow of seed.

The assembled bowl piece should look like this.  When you attach it to the bottle you may need to wiggle it...just a little bit (name that tune) to adjust that wire out of the way of the bottle's rim.   Okay, last part.  You'll need a cage from which to hang your bottle.

I've used four different colors of fine craft wire - five feet of each color.  Holding all four pieces together, bend them in half and begin twisting them. You'll only need to twist enough to go around the neck of the bottle.  And, leave a small loop at the place that you bent the wires.   Pull the wires through the loop and bend them back on themselves.  


Here's were the fun begins, separate the wires so that you have four bundles of two (I separated mine by color). Now think chicken wire. Wrap two bundles around the bottle and twist them together a few times.  Bring those same bundles back in the same direction from which they came and twist them each to one of the remaining bundles.  Continue in this fashion until you get to the bottom of the bottle. (This might require some video!)

Now gather up all of your pieces, twist them together and form a closed loop for hanging. 

Fill 'er up, screw on the lid/bowl assembly and hang it in the garden.

Monday, May 21, 2012

Cork Vases - Check!

I checked off one of my upcycled projects from my list today!  Aren't they cute?


I've seen pictures of these floating around on the web somewhere and I've been wanting to give it a try.  In fact, I've had the air plants kicking around the house for almost a month.  It's so much harder to get stuff done when you have to go to work!  Anyway, I'm no expert but here's how I did it.


Pull together your supplies:
- Cork
- Air Plant
- Magnet
- Hot glue gun
- Small Craft Knife

You'll need to make two adjustments to the cork with your craft knife.  First you'll slice a piece of the cork off to give you a flat surface to glue your magnet to.  You can shave off the top or bottom depending on the orientation of your finished vase and the size of your plant.  That really big plant in the center of the first picture requires the magnet to be on the bottom...unless you want to display your plant upside down.


Then you'll need to carve out a hole in the top, just big enough to snuggly fit the root/stem of the air plant into it.  Don't be tempted to use a drill here.  It'll work but it's very likely that you'll drill through a finger...yeah, I tried and it was pretty scarey!

Then you just need to hot glue your magnet on the back and stuff the stem and any roots into the hole, hang and viola!  Can't wait to hang them in my cubicle window (yes, my cube has a window) when I return to work next week.

A good dunk once a week and my plants should stay looking fresh.

Thursday, May 3, 2012

Rustic Upcycled Cord Storage

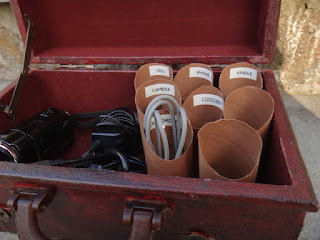
The cords for all the electronic devices laying around the house are making me crazy!  I've seen some nifty ideas around the web using toilet paper rolls to store them in.  Since I often use my cords on different floors of my house, I wanted to make something that was portable.  Check out this trunk that I picked up at a yard sale:


It's a small decorative piece sitting on my shelf day to day.  But when I open it up, viola:


Cardboard tubes organize my cords and there is still room left for larger chargers that plug into the wall and for both my still and video cameras.  I took the liberty of cutting the tops of the tubes at an angle and labeling the taller edge.  They are the perfect size for a snug fit when the lid is closed making moving the case without jumbling everything up a breeze!

Tuesday, May 1, 2012

My First Upcycled Food Post

I figured I'd take a little break from the norm and share my dinner.


Chicken, spinach and applesauce and yes, it's upcycled!  Well the bread crumbs are anyway.  You know those less desirable heels of the bread?  Do you eat them?  I don't, so rather than toss them in the trash I toss them in the freezer until I have the need for bread crumbs.  Then I toss them in the blender with some crushed blacked pepper and some seasonings.  Tonight I used cajun seasonings but I like them with Italian seasonings as well.  Next time you open a fresh loaf save some trash and some cash with your own bread crumbs!
Related Posts Plugin for WordPress, Blogger...