Pages

Showing posts with label upcycled craft. Show all posts

Wednesday, June 25, 2014

How to Make a Bird Feeder from a Liquor Bottle

Anyone else have baby birds galore in their yard?  With lots of little mouths to feed, wouldn't it be nice to help out the adult birds with an extra feeder or two? I've been making and selling these fabulously upcycled bird feeders for two years now.  I only sell them at festivals, farmers markets and the like.  Because they are so expensive to ship, you won't find them in my Etsy shop anymore.  So I thought, why not show the rest of the world how I make them.  Check it out, I officially call them Booze Bottle Bird Feeders:


They're pretty easy to make once you get past the drilling a hole in glass part.  But, remember, I showed you how to do that in my last post.  You'll need just a few supplies:

1.  Wine or liquor bottle with the original cap or a cork
2.  A thrift store plate
3.  A 12-18" (ish) length of copper wire
4.  Vice Grip (best ten bucks I've spent in a long time!)
5.  Clear Silicone
6.  And if you don't already have one, a Diamond Hole Saw for drilling your holes in the bottle

Once you've drilled your holes in the "booze" bottle, you can use your vice grip to shape and coil the copper wire around the neck of the bottle to form your hanger.  Then simply add a solid bead of silicone adhesive to the bottom of your bottle and press it into place on your plate.  Set it aside to cure and in a short three hours time, you'll have your very own booze bottle bird feeder.  Now go raid your recycle bin...or the neighbors and get to it!

Thursday, February 27, 2014

How to Make a 3D Fringed Flower from a T-shirt

I love these 3D flowers made from thrifted T-shirts and I'm going to show you how easy it is to make them!

First, a confession.  I saw someone do a fringed T-shirt flower tutorial a few weeks ago and took a mental note so I could go back and give it a try.  And when I lost that mental note and couldn't find the original tutorial, I tried to do it myself. Needless to say, this is not what her flowers looked like.  They were a great deal flatter and I'd still like to give it a try. So, if you know the tutorial I'm talking about PLEASE leave a link in the comments.

I made a quick little video tutorial to show you how I made these flowers.  You can find it here.  So gather up your supplies; an old T-shirt, fabric glue and a pair of scissors and join me.  And stay tuned because I have an idea or two for using these flowers in other projects.

Friday, January 11, 2013

How to Make an Upcycled Sandwich Board

Ah the wonders of chalkboard paint!  You can turn just about any piece of trash into a work of art or something that is super useful with a few strokes of a brush.  Today, I'll show you my new sandwich board that I plan to use at craft fairs this Spring.


Lovely, eh?  Want to give one a whirl for yourself?  It would make a great chalkboard for a wee little one's playroom too.  To make yours, gather up the following supplies:

  • Two kitchen cabinet doors of the same size. Habitat for Humanity's ReStore is a great source for these.
  • Chalkboard paint (you can make your own if you don't have any laying around the house - or don't feel like giving your right arm and leg for it)
  • A couple strips of fabric about an inch or two wide and 10" long.  I'm  using strips of denim from an old pair of jeans but you could use an old belt or anything that will keep the two doors from sliding all the way open
  • 4 Nails or decorative brads
  • 2 hinges (mine were still attached to the cabinets when I bought them)
  • Screwdriver and screws to fit the hinges 
My doors from ReStore
Let's start by prepping and painting  those doors.
  • Remove all the existing hardware and set it aside for later use
  • Sand the doors down so that the existing paint or finish is no longer shiny.
  • Prime both sides completely
  • Paint the front and back.   If you plan to paint a border that is not chalkboard paint like mine, I suggest you do your painting opposite the way I did it.  So start by painting the back side and the border.  Then glaze with a protective glaze.  I really like this crystal clear enamel  protective glaze, it doesn't yellow like so many others.  THEN paint out your chalkboard area (do NOT spray with the glaze).  I did the chalkboard area first and then had to cover it so I didn't accidentally coat it with glaze.
Glaze all of the non-chalkboard areas


Let your doors cure for 24 hours, then start putting everything together.
  • First line up your hinges on the back side of the doors where the top of the doors meet and mark the holes
  • Drill small pilot holes on the spots you just marked
  • Screw your hinges into place
I added a bit of purple paint to the bit of hinge that shows on the top


Now add a couple of strips of fabric with nails or decorative brads.  Once you've primed your chalkboard you (or the kids) are ready to draw all over it.


To prime your new chalkboard: Rub the side of a piece of chalk all over the board, make sure you cover it completely.  Erase it and you're chalkboard is now ready.


Friday, November 30, 2012

How Many Christmas Words in a Scrabble Game?

So just how many Christmas words can you get from a Scrabble game?  Really, I don't know the answer to that question.  You see, in case you haven't noticed, I'm an upcycler.  That means that when I purchased my Scrabble game it was from a yard sale.  The sale came with a comment something similar to this, "I'm not sure all the pieces are there...."  Unlike most people who spend their hard earned cash on board games, this was music to my ears!  "I'll take it!" 

So, I set off to make some ornaments with my Scrabble game.  You've seen the ones where they put the letters in the rack and use it as part of the ornament, right?


I decided to mix things up a bit with mine.  I addition to painting the racks and using them in the ornament, I also used ribbons and other upcycled bits in them.  I'll show you mine, but as for a tutorial, if you know how to use a glue gun then it's pretty self explanatory.


I also did some with scrap pieces of ribbon and cording that have been taking up space for a couple of holiday seasons now:


Nifty right?  You could even use the letters to spell out the names of all the members of your family....pets, too.  Great opportunity to teach a spelling lesson to the younger kids in the family without them even knowing it!  The possibilities are a many! 

In all I ended up with about  15 or so ornaments from this one maybe incomplete game of Scrabble and a ton of leftover tiles with the letter I on them.  If you come up with some great Christmas words using a few Is, post below (please).

Monday, August 6, 2012

An Old Globe that Can Hold Just About Anything

You can tell when it's craft fair season from the types of posts I write.  This one is a little something that displays my soda can butterflies.  Although, now I'm finding that people are noticing the display piece more than butterflies, hmm...   At any rate, it is a fabulous little piece and it really could be used to house just about anything around the house.  Before I used it at a craft fair for the first time, it sat on my kitchen counter collecting receipts.  You could use it to collect mail, too.

Here's how I made it.  First gather your supplies:
1.  The Southern hemisphere of a globe (I picked up a globe from Goodwill that had a smashed stand, it's cardboard and easily pops apart along the equator)
2. Adhesive (I used silicone because it leaves a nice thick bead that would cover more surface area of the round globe but exopy would likely work as well) 
3.  Something to use as a stand (mine is a smaller urn style planter, but you could use a larger candle holder - just use whatcha got)
4.  Finishing tape (I'm using a foil tape that is used to finish the edges of stained glass but you can use that scrapbooking tape as well)
5.  Old Maps (or newspapers or magazines)
6.  Decoupage glue and a foam paint brush

This one really doesn't need all that much explaining so I thought I'd try to do in one step, here goes:


To use this as a planter, I popped a round Chinese food takeout lid into the bottom of the globe.  It provides a nice flat surface for the plant to sit on and catches any moisture from the plant.  I recommend removing the plant to water it and letting it dry in the sink a bit before returning it to the globe.

How will you use yours?


Clearance Appliances at BidCactus

Friday, June 29, 2012

An Upcycled Tabletop Fire Feature

If you're following me on Pinterest then you've likely seen this DIY project from Curbly.com pinned to my boards:


It's cute, right?  I pinned it so I could come up with an upcycled version....and I did.  Here it is:


I swear it's lit, but it's really hard to see in the daylight!


This was SO easy and the only thing I bought was the fuel.  Here's what you need and what to do:


...it's that easy!

Here's how it's upcyled:

1.  I had this vase left over from a party that I threw years ago in my former life as a Volunteer Manager.  I would have liked a taller one, but the one I had broke in my last move and you know me...use what you have!  If you don't have one, you can thrift for a buck a two and they are the thick heavy ones!

2.  The glass rocks I've had for at least 7 years and have used them to decorate around candles as well as in flower vases.

The fuel that I bought (at Party City) had a closed lid with a wick which made adding the rocks super easy.  Just toss everything in the vase and light the wick.  Easy Peasy!

Here's a pretty crappy indoor picture to show you that does actually have a flame:


Tuesday, May 29, 2012

The Anatomy of a Teabag

With summer only a few weeks away, of course you're thinking icy cold beverages.  Maybe a tall glass of sweet tea in the South or sun brewed tea in the North?  Before you toss those used tea bags in trash, consider this:


You can compost the tags and strings, it's all organic matter.  And, just as coffee grounds feed your roses and other garden inhabitants so do tea leaves.  Sprinkle used leaves around plants or just toss 'em in the compost bin along with the tags.

And how about those beautifully tea stained tea bags?  Craft material, of course!  Check out how I made these flowers:


So what's left for the trash?  That little staple, that's it!  Now go grab a tall icy cold glass of tea and enjoy the season!

Wednesday, May 23, 2012

My Snapple Bird Feeder

Have you seen those bird feeders using glass bottles in a wooden frame attached to the house?  I've seen a couple but I really wanted a hanging version, so I made this bird feeder:


I think it needs a bit of design work but the concept is ready to share, you might to grab a cup of coffee, this is a long one.  Here's what you'll need to make your very own upcycled bird feeder:

1. A glass bottle with lid, you'll want a bottle with a larger opening so the seed will fit through.
2. The bottom of a 2 liter soda bottle
3. Craft wire
4. Galvanized Steel Wire
5. Drill, maybe.  If you can start the hole in the lid with a nail and hammer you can use a good pair of scissors to widen the hole
6.  Scissors...oh yeah, you'll need a blow dryer too.

The first thing you'll want to do is set up the cup portion of the feeder.  Cut around the bottom of the soda bottle to give you the shape of the flower.  Be careful not to cut too low between the "petals" or you'll end up with a leaky cup.

To help the birds latch on you'll need to make a sort of ledge on the petals.  Nothing fancy, just flip your bottle bottom over so the petal tips are on the table and use your blow dryer heat the edges.  As you do, apply a little pressure to guide the shape. This will help the edges bend over instead of just giving you a way appearance.    This doesn't take very long so be sure to keep an eye on it.


Now we need to attach this to the lid, so drill a hole in the lid and use a pair of scissors to widen the hole.  It needs to be pretty wide to fit the seed through (I had to widen the hole in the picture) but not so wide that steel loop falls out.

Now grab a length of galvanized steel wire, 12-15" long should do it.   Take one end and form a loop that is just slightly smaller than the caps diameter.  Then make a 90 degree angle in the wire at a spot that will allow the wire to pass through the center of the hole in the lid.
You'll repeat a similar process to attach the feeding bowl.  First poke a hole in the center of the soda bottle bottom and insert the steel wire. Form a loop that will support the bowl.  Make any adjustments that you need to make so that the bowl lies flat on the galvanized wire.  When determining how long to make the piece of wire between the lid and the bowl, keep in mind that the lid should be inside the bowl to control the flow of seed.

The assembled bowl piece should look like this.  When you attach it to the bottle you may need to wiggle it...just a little bit (name that tune) to adjust that wire out of the way of the bottle's rim.   Okay, last part.  You'll need a cage from which to hang your bottle.

I've used four different colors of fine craft wire - five feet of each color.  Holding all four pieces together, bend them in half and begin twisting them. You'll only need to twist enough to go around the neck of the bottle.  And, leave a small loop at the place that you bent the wires.   Pull the wires through the loop and bend them back on themselves.  


Here's were the fun begins, separate the wires so that you have four bundles of two (I separated mine by color). Now think chicken wire. Wrap two bundles around the bottle and twist them together a few times.  Bring those same bundles back in the same direction from which they came and twist them each to one of the remaining bundles.  Continue in this fashion until you get to the bottom of the bottle. (This might require some video!)

Now gather up all of your pieces, twist them together and form a closed loop for hanging. 

Fill 'er up, screw on the lid/bowl assembly and hang it in the garden.

Monday, April 23, 2012

My Newly Upcycled Bird Bath

I love this bird feeder!  It's little, it's cute, it's one-of-a-kind and it's upcycled!


After a morning of yard sales that left me empty handed, I headed to my nearest Goodwill on the hunt for some wonderful pieces to make my own bird feeder.  I found some wonderful bowl-like dishes that would have been beautiful in my garden.  But they were part of a complete set that still had lots of life left in them in their current form and I only needed one.  So off I went to continue my search through the adjacent isles.  Just when I was about to give up, along came this beauty:


It was the only one, tucked in the back of a shelf and the perfect reward for resisting taking one from a full set earlier.  I picked up a perfectly matched flower vase to serve as pedestal of my bird bath.  And all I had to do was use a little silicone adhesive between the two.

Just one more look:


Isn't it adorable?

Tuesday, April 17, 2012

How to Turn a Candle Holder into a Table

Sound absurd?  Well I'm not talking about one of those tiny table top candle holders nor am I suggesting you turn it into a full sized dining table.  Rather a free standing floor candle holder turned into the perfectly sized side tabe. But this tutorial I will not be posting on my blog today, or any other day for that matter, you have to hop over to Buzzfeed to see how I made this magic.

Today, on Buzzfeed it's all out war - a craft war that is.  Buzzfeed Shift has pit Upcycler against Upcycler to see who could come up with something a little unexpected made out of stuff that might otherwise end up in the landfill.  It's Upcycled Stuff vs. Yummy Goods, rather candle holder turned side table vs. old yoga Tee turned refashioned bird Tee.
Here's my table that I made out of a candle holder and a bunch of coiled newspaper


Wanna see how?  Go check it on BuzzFeed and while you're there....VOTE FOR ME!!

Sunday, March 25, 2012

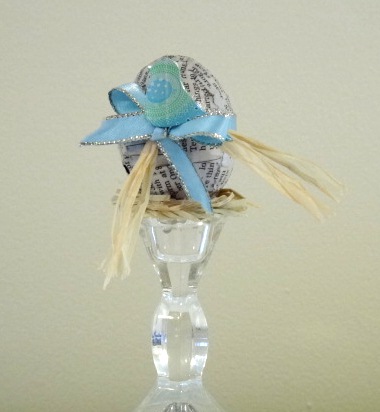
An Upcycled Springtime Egg

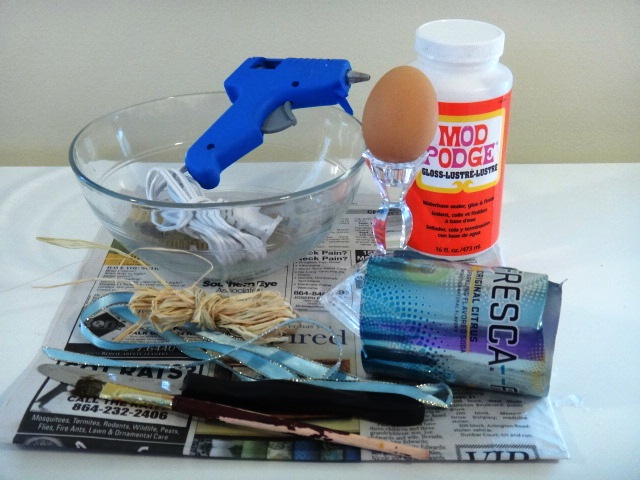
I recently received an email from a local craft store that gave me how-to instructions to make a really pretty spring time egg decoration.  Of course this wasn't just a free tutorial for the sake of a free tutorial, it was an opportunity to sell all the pieces that go into making this decoration.  The pieces that I would have had to purchase were; a wooden stand, a wooden egg and scrapbooking paper that looked like old music sheets. Well, here's the tutorial for the free UPCYCLED version. 

First, gather up your supplies:

Newspaper (or sheet music, magazine pages, etc.)
An egg
Old candlestick
Scrap ribbon or fabric and raffia or dried moss
A serrated knife
Mod Podge and a paint brush
Hot Glue Gun

There is no need to buy a wooden egg made from virgin materials when you have all you need sitting in your fridge.  Grab a mixing bowl, your serrated knife and an egg.  Holding the egg over you bowl, tap your egg firmly with the serrated knife to get it started .  It'll look a bit like the picture, don't worry about making it perfect since you'll be covering it with paper.  Wiggle your knife into the egg as you continue to move it around the egg.  You'll get about halfway around when it starts to give and you can just pull it open.


Run some hot water on the shell to get rid of the goo and pat dry before putting the eggshell back together again.  I tried a couple of things to get the shell back together.  I can tell you Mod Podge does NOT work.  You can see the glossy strip of dried Mod Podge going around my egg.  But hot glue seemed to do the trick.  It doesn't have to completely seal the egg, I just sealed a bit on two opposite sides to hold it together until I could apply the papier mache.

Now for the egg covering.  Why on earth would you buy brand new paper that looks like sheet music?  If you have sheet music laying around that you are no longer using then, by all means tear it up.  I didn't have any so I used newspaper.   Take a strip and apply it around the egg with Mod Podge.  Then continue to add strips around the shell until it's completely covered.  Use plenty of Mod Podge and smooth all the edges down on the egg.  Now go scramble that egg while you wait for it to dry.

Once your egg is dry, you can finish assembling the pieces.  I twisted several strands of raffia and hot glued them to the candlestick to resemble a nest.  You could also use a pinch of dried moss if you have that.  Then hot glue your egg into the nest.

To dress up the egg, use what you have.  I had a scrap piece of ribbon that was tied onto a gift (the original tag was still attached to it) that I tied around the egg with some additional strands of raffia. Then I cut a bird shape from a Fresca can and glued it to the bow.

Whadda ya think?  Still think you need to buy all that new stuff?


Tuesday, February 28, 2012

How to: Upcycled Mail Organizer

I have a whole list of things that I need to make so that my new place can be more functional and homier.  This mail/misc. stuff organizer is the first project!


Here are the basic supplies
1.  Boxes in assorted sized
2.  Newspaper or magazines
3.  Mod Podge
4.  Paint Brush
5.  Grommet Setter and Grommets
6.  Glue (I used wood glue but hot glue is probably fine)
7.  Another other decorative elements you'd like to use


Once you've figured out how many "pockets" your  mail sorter will need you can start cutting them to size and glueing them together.  I had two boxes from Christmas lights and two from coffee that were perfect.  You can use bigger boxes and create pockets with pieces of cardboard (just "papier mache" them into place) if you don't have perfectly sized smaller boxers. 

Use binder clamps to hold the boxes while the glue dries
Once your sorter is completely assembled you can start to add your newspaper strips with Mod Podge.  Start with all the seams to make sure you cover them completely.  Note that I added a back piece to my sorter to easily add grommets to the top for hanging and a place to hang my keys underneath.


Cover your structure completely.  You'll question the stability of your mail sorter as it may feel a little flimsy when wet.  But once everything is dry, I think you'll be pretty confident in the sturdiness of the final product.


Now comes the fun part, decorate as you wish.  I painted mine white to match the trim in my kitchen, added little butterfly grommets to reinforce the area that would hang from the nails, a flower that I made from an Arizona Tea can and even added some old knobs (for my keys) that I removed from a set of indoor shutters that I used in another project. 


Only one thing left to do....

Related Posts Plugin for WordPress, Blogger...