Pages

Showing posts with label eco crafts. Show all posts

Thursday, August 2, 2012

How to Make...Soda Bottle Bottom Flowers (say that three times fast)


Oh yeah, it's a statement piece!  Only the brave few can actually wear it but I love looking at it as it sits front and center on my craft fair table.  It certainly draws attention too!  Although this soda bottle flower was turned into a pendant, you can attach a pin to it and wear it on a handbag or a jacket or maybe even attach a hair pin.  Really the possibilities are endless with a little imagination.

Wanna see how I make them?  Check out this YouTube tutorial and upcycle some of those plastic bottles.


Stuff4 Painting

Sunday, March 25, 2012

An Upcycled Springtime Egg

I recently received an email from a local craft store that gave me how-to instructions to make a really pretty spring time egg decoration.  Of course this wasn't just a free tutorial for the sake of a free tutorial, it was an opportunity to sell all the pieces that go into making this decoration.  The pieces that I would have had to purchase were; a wooden stand, a wooden egg and scrapbooking paper that looked like old music sheets. Well, here's the tutorial for the free UPCYCLED version. 

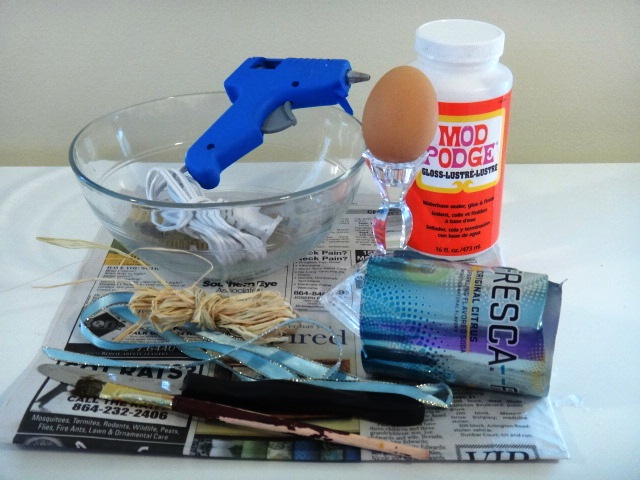
First, gather up your supplies:

Newspaper (or sheet music, magazine pages, etc.)
An egg
Old candlestick
Scrap ribbon or fabric and raffia or dried moss
A serrated knife
Mod Podge and a paint brush
Hot Glue Gun

There is no need to buy a wooden egg made from virgin materials when you have all you need sitting in your fridge.  Grab a mixing bowl, your serrated knife and an egg.  Holding the egg over you bowl, tap your egg firmly with the serrated knife to get it started .  It'll look a bit like the picture, don't worry about making it perfect since you'll be covering it with paper.  Wiggle your knife into the egg as you continue to move it around the egg.  You'll get about halfway around when it starts to give and you can just pull it open.


Run some hot water on the shell to get rid of the goo and pat dry before putting the eggshell back together again.  I tried a couple of things to get the shell back together.  I can tell you Mod Podge does NOT work.  You can see the glossy strip of dried Mod Podge going around my egg.  But hot glue seemed to do the trick.  It doesn't have to completely seal the egg, I just sealed a bit on two opposite sides to hold it together until I could apply the papier mache.

Now for the egg covering.  Why on earth would you buy brand new paper that looks like sheet music?  If you have sheet music laying around that you are no longer using then, by all means tear it up.  I didn't have any so I used newspaper.   Take a strip and apply it around the egg with Mod Podge.  Then continue to add strips around the shell until it's completely covered.  Use plenty of Mod Podge and smooth all the edges down on the egg.  Now go scramble that egg while you wait for it to dry.

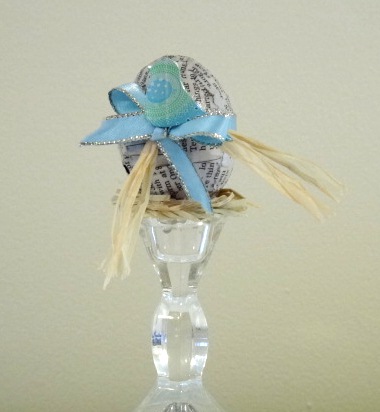
Once your egg is dry, you can finish assembling the pieces.  I twisted several strands of raffia and hot glued them to the candlestick to resemble a nest.  You could also use a pinch of dried moss if you have that.  Then hot glue your egg into the nest.

To dress up the egg, use what you have.  I had a scrap piece of ribbon that was tied onto a gift (the original tag was still attached to it) that I tied around the egg with some additional strands of raffia. Then I cut a bird shape from a Fresca can and glued it to the bow.

Whadda ya think?  Still think you need to buy all that new stuff?


Saturday, October 29, 2011

DIY Cereal Box Pocket Folder

It seems like I finish one organization project and another one pops up over night.  This time it's my file drawers, I would show you a before picture but I'm too ashamed!  Instead, I'll show you how to reuse some things that you have laying around the house to make pocket folders for those larger items that need organizing.  Here's one that I use to store my ECO-Fi felt sheets:


Here's what you'll need; assorted cardboard boxes, an old manila folder to use as a template, tacky glue, old t-shirt, something to cut with and a marker


Begin by placing the fold of the manila folder on one of the folds of your box and trace the edges of your template


Cut your folder out.  Now if you just need a few small folders to organize papers and such you can stop here and repeat for as many folders as you need.  Read on to complete your pocket folder...


Use an old t-shirt to cut a strip that will form the side of your pocket.  You should cut the strip to be a minimum of 1" wider (1/2" for each side) than the side opening of the folder and a minimum of 1" longer than the height.


Add a little tacky glue along the edge of the cereal box to the first fold and attach the t-shirt fabric to it.  Give a little time adhere before you move on


Fold the finished side up and glue the t-shirt to the bottom of of the file pocket

Then add glue to the remaining unfinished edge, fold it upwards and press the t-shirt into place

Repeat on the second side and you're ready to label and fill your new upcycled pocket folder!

Thursday, September 8, 2011

Paper Beads Out of Just About Anything

A few months ago I started to experiment with making paper beads out of packaging material; from frozen food containers to feminine hygiene packaging, you name it I've tried it.  And it's created some really cool pieces, like this necklace made from a Tampax box.  However, I often found that the pieces of the cardboard would separate making the rolling process more of a challenge than I like.  I decided one day to stop fighting it and happy that I had because I ended up with a finished product that looked like this bracelet.

To achieve this sleeker look I had to peel the layers of the cardboard apart which means that I have a mass quantity of cardboard shreds sans color that I was going to have to chuck into the recycle bin.  I did not like this idea, so I came up with a better way to use those bland cardboard strips in my paper bead making endeavors.  Check out this two part tutorial on YouTube to see what I did.


First how to get your cardboard strips and roll those beads:


And now to add a little color and glaze those puppies:


Have fun and post below to tell me how you used your paper beads!

Saturday, August 27, 2011

Plastic Ring Necklaces

So, I done did it now!  I went and broadcast myself on YouTube.  Check out my very first video tute, give it a thumbs up and a kind comment.  While you're there pull out some of those pesky plastic rings that are left behind on the neck of your soda bottles and some scrap fabric and join me in making a necklace.  This is great project for adults but can be easily simplified for a child as well.  Enjoy!


Tuesday, August 23, 2011

Preparing for Soy Candle Making

If you remember a while back, I promised a soy candle making tutorial.  Well, I have taken my time to really find the most efficient and earth friendly way to present this overwhelming amount of information.  In fact, I find it so overwhelming that I will be presenting this tutorial in a 2-part blog.  In order to incorporate your upcycled elements you will have to do a bit of work to gather your supplies so I thought that I would start there.

Pure soy candles have a very low melting point.  That means that, unlike paraffin, the entire top of your candle becomes a pool of melted wax when the wick is burning.  For this reason, pure soy candles need to be housed in a container.  This is the fun part! 

Start collecting glass containers from anywhere you can find.  In the picture to the right you'll see that I have a B&M baked bean jar, sake cups, water goblets and some miscellaneous heart shaped containers.  Most of these were yard sale items and many mismatched pieces that wouldn't find much use elsewhere.  A word of caution when selecting your containers:  If you pick clear glass, I recommend selecting glass that is textured.  Why? Wet spots will happen, even in soy candles sold in retail stores.  Don't worry, there is nothing wrong with your candle and it isn't actually wet, it will just look like the wax didn't ever dry in one spot.  It isn't very pretty and it will bug you, the texture disguises it.

You'll also want to start collecting containers for mixing and melting your wax.  Soy wax is super easy to melt in the microwave....yes, the microwave!  So hit the thrift shops and yard sales in pursuit of large glass measuring cups.  You can not only melt your wax in these but they are easy to pour from as well.  Plastic will start to deform as it holds that hot liquid so definitely stick with the glass.

I found it easiest (after trying many different methods) to melt all of my wax in one container and then pour it and any essential oils in separate containers.  The containers that I chose were upcycled as well.  I saved coffee cans and other large tin food containers.  Be very careful that you take a minute to file down the sharp point that is formed at the location where you snapped the lid off.  It is really sharp and you'll feel it when you're cleaning up.  The cans are also really easy to tap with a hammer to form a pouring spout, kind of like the one on the coffee can to the left.

What else will you need?  Here's a list:
1.  Soy wax - here is my two cents.  If you're going to spend the money on soy, go 100% pure soy.  Soy blends will allow you to make pillars and such but it is not as natural as it could be and look what happened to my experimental batch (it's called frosting, but your candle tops should be smooth as a babies bottom!):

I would also encourage you to really think about the amount of wax you will need.  I bought a 2 pound bag at the craft store for $10 and that was for the blend.  I bought 50 pounds of 100% pure soy wax online and (including the $25 dollar shipping fee) only ended up paying $2 per pound. 
2.  A digital scale.  Yes you need it, I fought it and regretted it!
3.  A thermometer.  Save your money and just buy a regular kitchen thermometer no need for a specialized candle making one.  Your wax shouldn't get much above 150 degrees.
4.  Fragrance and color if you choose to use either of them.
5.  And don't forget your wicks!  Opt for the all cotton wicks for a clean burn.  Remember a lot of those metal cores have lead in them.

So there you have it, your shopping list.  Start gathering your supplies and meet me back here for part 2 this weekend and we'll get those candles burnin'.

Thursday, July 7, 2011

What are you Upcycling in Your Compost Bin?

Slowly but surely the little critters who have taken up residence in my compost bin are eating and pooping their way through my table scraps and garden clippings.  Sometimes it's a challenge to come up with compostable trash when you live alone, one certainly doesn't produce the waste that a family of four does.  If you have the same problem or simply want to compost more here are some things that maybe you haven't considered before:

1.  Dryer lint - or that disgusting wad of lint you pulled off your refrigerator coils

2.  Pet hair - Although I live alone, there is certainly an abundance of pet hair in my apartment

3. Wine - though you'd have to leave some in the bottle (or box, if you prefer) to compost
4.  Burlap

5.  Fish bones

6.  Cotton balls/swabs (with cardboard sticks, not plastic)

7.  Egg Shells - or crush up and spread them around your plants to keep snails and other would be predators from chomping on your plants

8.  Coffee Grounds/Tea Leaves - Coffee grounds are also terrific added straight to the soil surrounding acid loving plants such as azaleas, rhododendrons, and roses.

9.  Jello

10. Old Pasta and rice - plain and cooked

11.  Elmer's Glue

12. Cage Droppings from your herbivorous pets (birds, bunnies, guinea pigs) - don't forget the bedding, it's an excellent source of carbon for the pile

13. Crustacean Shells (shrimp, lobster, crab)

14.  Wool Socks or any other natural fiber clothing; cotton, hemp, etc.

15.  and my favorite...Toenail Clippings!  Seriously....Google it!

And for a little bonus, I couldn't quite bring myself to add this to my list but this article is really a funny read.

Happy Composting!

Saturday, April 30, 2011

More to do with Magazines: How to Make a Wallet

There are lots of similar tutorials out there for homemade wallets that divert magazine pages from the recycle bin that use packing tape as a laminating agent.  I wanted to find a way to make them so that you didn't have to deal with the seams that are created from the strips of packing tape.  I also wanted to soften them up a bit.  Well, I found a way!  With both Mother's and Father's Day coming up, I hope you'll find it easy enough for the kids to get involved too, they will need a little assistance though!

Start by gathering up some supplies.  Pick some of your favorite pictures from magazines that you already have laying around the house.  It could be from a gardening, hobby, fashion or celebrity magazine.  Just find something that you (or the person you're making it for) love. You'll also need a roll of clear contact paper and something to cut with.  I use a rotary cutter and straight edge but scissors are fine too. And finally, you'll use a sewing machine to stitch up the sides.

Start by trimming the rough edge of your magazine page.  Before you begin laminating, you'll want to make sure your page is the right size for your wallet.  Begin by folding the "wrong side" of your wallet together leaving the bottom edge slightly lower than the top, like this:


Then fold the bottom edge up one more time.  This will form the pocket that will hold your cards so you're only going to fold it as far as necessary, but not too far or you'll have to dig to get your cards out.  Use a card as a guide, it should look like this:


Now cut off 12 inches from your roll of contact paper.  You'll want to make sure to remove the backing carefully, lay the sheet out as flat as possible as you peel.  It's very easy to make unsightly creases in the contact paper if it folds up during the peeling process.  Okay, lay your contact paper out in front of you with the sticky side up.  Like so:


As you can see, I got a crease.  Adjust the laminate, so creases are closest to you as they will be on the inside of the wallet and likely hidden in the folding process. Now grab your magazine page and carefully place it wrong side up on the laminate.  Where you place it is not all that important, you just want to make sure that you leave a margin all the way around, like so:


Then you'll make some cuts to make folding the laminate easier.  So you'll make a cut from the magazine page to the bottom of the laminate.  You'll start your cut approximately 1/2" in from the edge of the magazine page:


Repeat on all four corners:

Fold your two shorter edges up on the page as shown below.  I find it easiest to work on making sure my crease folds nice and straight before pressing the remaining laminate into place.  But making adjustments with contact paper is definitely easier than making them with packing tape!


Now cut off the four excess rectangles of contact paper, but save them as you will use them later:


Now fold the two remaining sides inward:


Once your margins are folded in, you'll have some exposed magazine paper in the center of the page.  Use your excess strips to cover them.  Don't worry about how it looks, it'll be on the inside but you want to be sure it's all covered to protect the wallet.

Now you can fold it all back up and bring it to your sewing machine.  Simple stitch down each side and your wallet is complete!


To finish it up, fold the wallet in half and tie a rubber band around it for a couple of days to help it keep it's shape.  I make a bunch at a time and usually only have to keep them in a band for about a day:


If you're feeling adventurous you can chop up a page or more and laminate the pieces separately then sew them all together instead of the folding.  You can make more pockets that way and the pictures and words on the inside don't have to be upside down.  I have both types in my Etsy shop.

If you try this method, let me know how it goes below.  Did you do anything different?  Either way, get creative and have fun with it!

Tuesday, January 18, 2011

Plastic Plastic Everywhere!

The very first true plastic, Bakelite, arrived on the scene over a hundred years ago and today it is everywhere!  It brings amazing benefits to our daily lives but at a high environmental cost.  While some plastics are recyclable, others are not.  So, in today's post we'll look at some alternative uses for the plastics that we consume on a daily basis.  While you are reading, be sure to keep in mind the verse Reduce, Reuse, Recycle.  All to often, we head straight to the Recycle part and forget about the Reduce and Reuse part.  While recycling is a great alternative to the trash can it also has some economic and environmental costs associated with it.  Here are some ways that I reuse the plastics in my life and hope that you'll post other great ideas below.


In the opening photo, I've chosen some plastics that are not recyclable in my community.  We are a little behind the times with plastics #1 and #2 being the only types of plastic accepted at our local facility.  I have stacks of plastic food containers (typically #5) that I use for a variety purposes.  Once they have been cleaned they are ready to store leftovers, craft supplies and much more.  Most of these smooth plastics can even be written on with a dry erase marker to label whatever is stored inside.  And when you're ready to store something else just wipe it clean and relabel it.

Pill bottles make great storage for little items.  For the jewelry that I sell in my Etsy shop I make beads out of newspaper, magazines and plastic bags and I store them in these pill containers until I am ready to use them.  While I lack the patience and talent for it, some artists make beautiful art with them. Here are some beautifully beaded pill bottles. As with all of your reused plastic containers, you'll want to be sure to wash out those bottles very well.


Another really great bead (or any number of small items) storing container is this one. It had Ferrero Rocher chocolates in it and I've used the containers both with and without the insert.  The one shown has the insert and is used to group similar beads that I want to keep together.

 How is this for a fun, messy and upcycled kids craft?  My niece and I  worked on some papier mache projects together.  We obviously used newspaper and balloons for the form.  But she's a little older and we wanted to add a little sophistication.  To accomplish this we added a base to each piece.  For the small ones we used milk and soda caps and for the larger pieces of art we used the bottom of Starbucks cups.  Add a little papier mache over the plastic pieces and viola - upcycled decorative bowls that stand upright!

 My passion for "doing right by the earth" surely stems from my love of animals.  Anyone who visits my home can make no bones about that statement when they are greeted by 5 cats, a dog, a bird and a tortoise (all rescues)!  You can only imagine the kitty litter that I go through with 5 cats.  I buy one 35 pound container EVERY week!  I can never bring myself to get rid of those amazing containers and have found so many uses for them. I use them for everything from christmas cords and decorations storage to collecting garden scraps whilst pruning and weeding.


They make pretty awesome recycling containers as well.  Check out this recycling container with swagger in my Etsy shop.  I have a feeling there are more where that one came from!


Please post you're ideas for reusing or upcycling your plastic below!

Starbucks Blonde
Related Posts Plugin for WordPress, Blogger...