Pages

Showing posts with label craft show display. Show all posts

Tuesday, March 5, 2013

An Upcycled Write and Wipe Board

Well, happy National Craft Month everyone!  I kicked the month off with a fabulous little farmer's market this past weekend in Clemson, SC.  Let me tell you, it was cold!  But that didn't stop all the brave souls from coming out and supporting their local artisans and farmers.  And I knew it wouldn't, so planning, prepping and designing went on full steam ahead! 

This year, I am looking to upgrade my booth and I have lots of new things planned.  I still have quite the to do list, from sewing new table skirts to designing more vertical space.  But, I thought I'd share a little something that I was able to finish up for Friday's event:


It's a small "write and wipe" board that I used to mark my new spoon necklaces.  I used a wet erase marker to write on the glass of this old picture frame so it's easy to reuse for something else when I need to.  Here's what I started with:


I picked up a couple of old gold frames from Goodwill for $0.50 and $1.00 and then added some spray paint left over from a bird feeder project.  And speaking of leftovers, I had some fabulous pink textured fabric leftover from this pet bed:

Princess Bed Made from a Drawer

So, I cut a piece of fabric equal to the cardboard that slides into the frame and used a little spray adhesive to attach them (spray the cardboard, not the fabric).


Then I Just slipped that back inside the frame and was ready to rock and roll....or write and wipe anyways!  Doesn't that fabric add a neat texture without interfering with lettering? 


I think I might make a larger one for the grocery shopping list.  How about you?  Where will you use yours?

Friday, January 11, 2013

How to Make an Upcycled Sandwich Board

Ah the wonders of chalkboard paint!  You can turn just about any piece of trash into a work of art or something that is super useful with a few strokes of a brush.  Today, I'll show you my new sandwich board that I plan to use at craft fairs this Spring.


Lovely, eh?  Want to give one a whirl for yourself?  It would make a great chalkboard for a wee little one's playroom too.  To make yours, gather up the following supplies:

  • Two kitchen cabinet doors of the same size. Habitat for Humanity's ReStore is a great source for these.
  • Chalkboard paint (you can make your own if you don't have any laying around the house - or don't feel like giving your right arm and leg for it)
  • A couple strips of fabric about an inch or two wide and 10" long.  I'm  using strips of denim from an old pair of jeans but you could use an old belt or anything that will keep the two doors from sliding all the way open
  • 4 Nails or decorative brads
  • 2 hinges (mine were still attached to the cabinets when I bought them)
  • Screwdriver and screws to fit the hinges 
My doors from ReStore
Let's start by prepping and painting  those doors.
  • Remove all the existing hardware and set it aside for later use
  • Sand the doors down so that the existing paint or finish is no longer shiny.
  • Prime both sides completely
  • Paint the front and back.   If you plan to paint a border that is not chalkboard paint like mine, I suggest you do your painting opposite the way I did it.  So start by painting the back side and the border.  Then glaze with a protective glaze.  I really like this crystal clear enamel  protective glaze, it doesn't yellow like so many others.  THEN paint out your chalkboard area (do NOT spray with the glaze).  I did the chalkboard area first and then had to cover it so I didn't accidentally coat it with glaze.
Glaze all of the non-chalkboard areas


Let your doors cure for 24 hours, then start putting everything together.
  • First line up your hinges on the back side of the doors where the top of the doors meet and mark the holes
  • Drill small pilot holes on the spots you just marked
  • Screw your hinges into place
I added a bit of purple paint to the bit of hinge that shows on the top


Now add a couple of strips of fabric with nails or decorative brads.  Once you've primed your chalkboard you (or the kids) are ready to draw all over it.


To prime your new chalkboard: Rub the side of a piece of chalk all over the board, make sure you cover it completely.  Erase it and you're chalkboard is now ready.


Monday, August 6, 2012

An Old Globe that Can Hold Just About Anything

You can tell when it's craft fair season from the types of posts I write.  This one is a little something that displays my soda can butterflies.  Although, now I'm finding that people are noticing the display piece more than butterflies, hmm...   At any rate, it is a fabulous little piece and it really could be used to house just about anything around the house.  Before I used it at a craft fair for the first time, it sat on my kitchen counter collecting receipts.  You could use it to collect mail, too.

Here's how I made it.  First gather your supplies:
1.  The Southern hemisphere of a globe (I picked up a globe from Goodwill that had a smashed stand, it's cardboard and easily pops apart along the equator)
2. Adhesive (I used silicone because it leaves a nice thick bead that would cover more surface area of the round globe but exopy would likely work as well) 
3.  Something to use as a stand (mine is a smaller urn style planter, but you could use a larger candle holder - just use whatcha got)
4.  Finishing tape (I'm using a foil tape that is used to finish the edges of stained glass but you can use that scrapbooking tape as well)
5.  Old Maps (or newspapers or magazines)
6.  Decoupage glue and a foam paint brush

This one really doesn't need all that much explaining so I thought I'd try to do in one step, here goes:


To use this as a planter, I popped a round Chinese food takeout lid into the bottom of the globe.  It provides a nice flat surface for the plant to sit on and catches any moisture from the plant.  I recommend removing the plant to water it and letting it dry in the sink a bit before returning it to the globe.

How will you use yours?


Clearance Appliances at BidCactus

Tuesday, July 31, 2012

A Little Upcycled Height for Your Craft Show Display

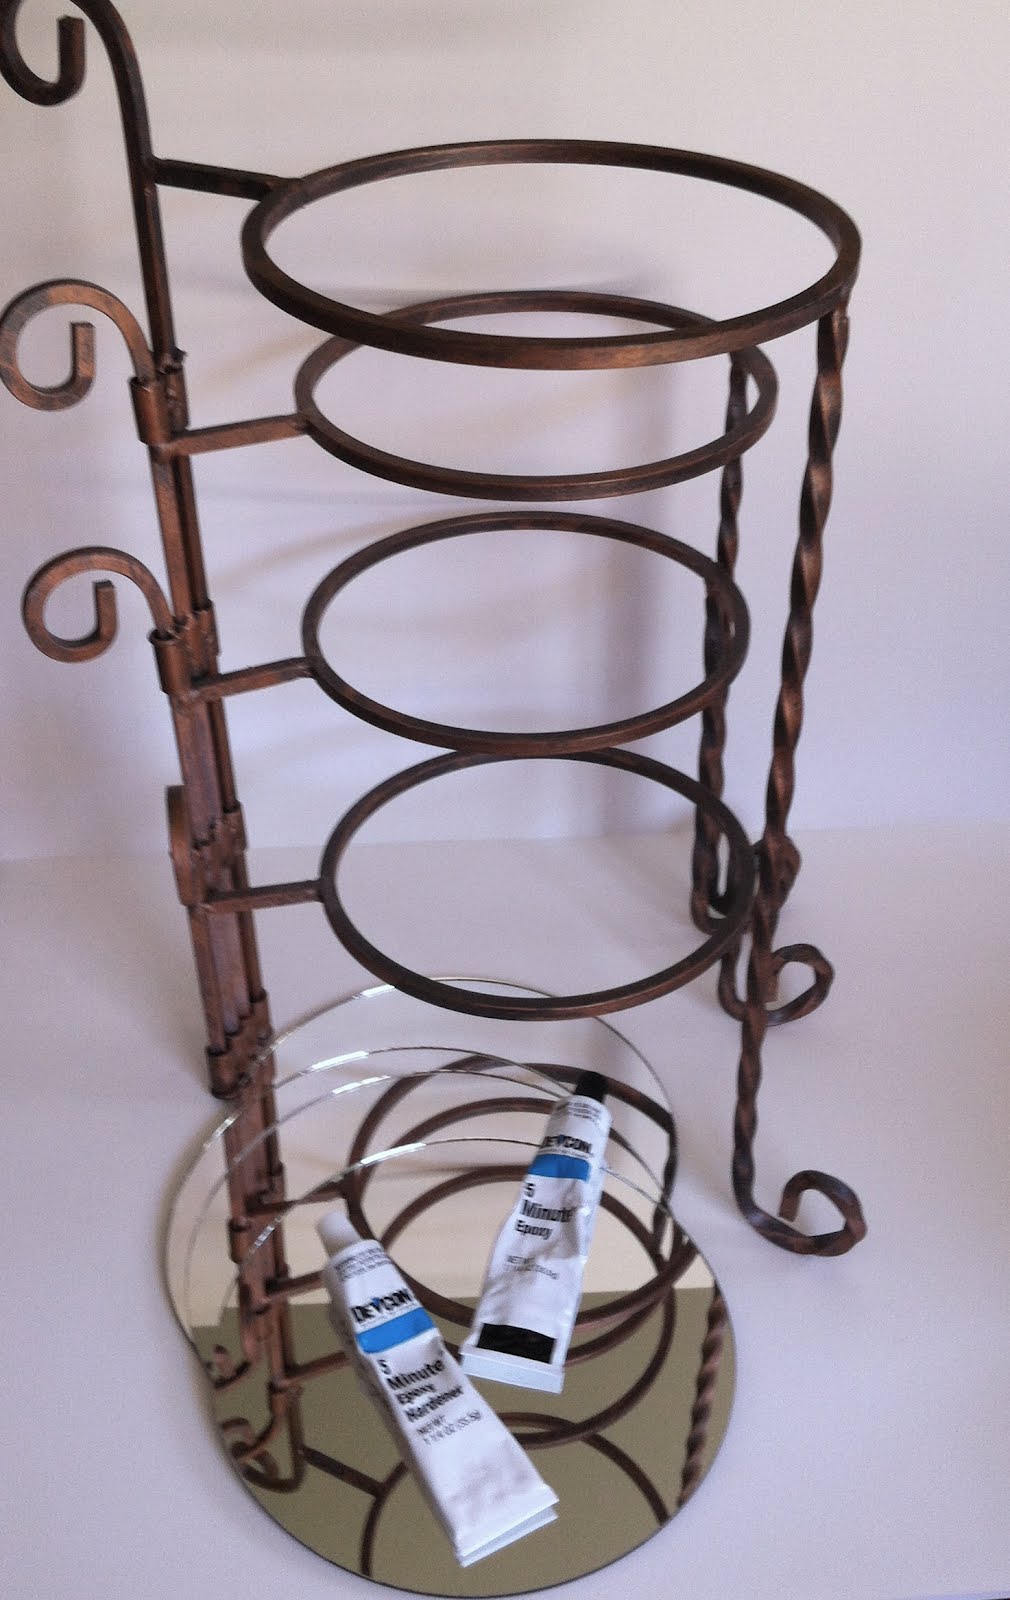
I've really had a blast this year making my patio-sized bird baths and feeders! Hauling and displaying them at craft shows has proven to be a bit more of a challenge, however, than my paper bead jewelry. While I can't do much about the hauling aspect of this new obsession, I was determined to find a way to add a little height to my bird bath/feeder display. I'm still working on finding additional ways to achieve the height that I'm looking for, but I did upcycle this old plant stand into a display stand for my smaller feeders:


All I needed to make this into a proper display was a few mirrors and epoxy. It really is as easy as mixing and applying the epoxy to the frame and setting the mirror onto the frame:


TIP: I use plastic lids for mixing my epoxy. Any excess will peel off the plastic once it's dry so I can re-use the lid over and over again (for crafting, I wouldn't use it to cover a container that has food in it).

Once your mirrors are dried into place, add your display pieces. I'm showing it with bird baths here but I think I might use it to display jewelry when summer is over.


Besides serving as the upcycled display I was looking for, what I really love about this stand is that it is somewhat collapsible making for easier packing into my tiny car. I had to apply the mirror pieces a bit off center but once the piece is open you can't even tell.

Thursday, October 6, 2011

Upcycled Sandbags

I've kept myself pretty busy over the past couple of months with shows, festivals and farmer's markets every weekend.  If I've learned one thing from all of these outdoor displays, it's that the wind is definitely NOT my friend.  Each time I do a new show, I invent some other way to use duct tape, industrial strength velcro, cement blocks and twine.  It's getting pretty crazy! 

To help keep my featherweight jewelry in place I've come up with a solution that is way cuter than duct tape and involves a few scraps from old clothes. These (mostly) tabletop sandbags are functional, washable and have upcycled cuteness written all over them.  They are great for shows but for the home as well.  Whether an outdoor picnic tablecloth or patio decor that needs anchoring, give these puppies a try!

First fill ziploc style bags with sand


Then cut the pockets, legs or arms (depending on the size you need) off of some old clothes and sew in some velcro at one opening.  You can even use this tutorial and add a drawstring instead of velcro


 And don't be afraid to add some embellishments that fit your theme


Then sew up all remaining open edges, drop your sandbags in and close the velcro


Place the sandbags anywhere you need a little extra weight
 

I'll use these cute smaller sandbags on my tables to keep table top easels from flipping off the table

PLEASE don't hesitate to share any of your "wind-stopping" techniques below, I know I'd love to hear about them!

Wednesday, September 7, 2011

Wordless Wednesday Featuring a Cassette Storage Riser/Mending Kit

I picked up two of these at a yard sale; one for cash the other for supplies
The two make great risers for the necklace stands in the back of the table!

Saturday, September 3, 2011

OLD Shutters Turned Jewelry Display Rack

I kicked off a pretty busy month of fairs and festivals this weekend at the Simpsonville Labor Day Family Festival.  In preparation I pulled together a fun little display for my upcycled jewelry out of two old shutters, I was pretty proud of it, what do you think?


Here's what they looked like when I picked 'em up for $10 from Craigslist:

Besides being filthy, there were big chunks of wood missing.  So, off to the hardware store for wood putty and hinges.  After applying the wood putty I ran over the surface of the shutters with a few different grits of sandpaper and had something that looked likes this:
Then I added a couple coats of spray paint (using my Goodwill sheet as a drop cloth):


Destiny has to be the center of attention ALL the time
Added a couple hinges and some shelf brackets to keep the display from falling backward while customers were browsing and viola!

Well, ALMOST viola!  I then decided that I wanted to be able to write right on the display so I added some chalkboard paint across the top of each shutter.


And ladies....I did it all by myself - ez peazy! Want to learn from my mistakes?  OK!  I was so careful to make sure that the slats of my shutters were all facing upward (so that my product would hang from them) that I didn't realize that one of my shutters was backwards.  So, while the slats were facing the right way it was still upside down and you can tell if you compare the trim along the top; one side is thicker than the other.  But really, who's going to notice?  If they do, I'll just tell them it was artistic liberty!

What else would I change?  Definitely by the time I hit the Apple Harvest Festival in Westminster, SC next weekend, I'm going to cover the entire trim with chalkboard paint.  There's just something about chalk!

Give it a try and then post a link to a picture of yours below!  Good luck and happy upcycling!

Related Posts Plugin for WordPress, Blogger...