Pages

Friday, March 25, 2011

Recycle it, Upcycle it, Freecycle it!

A couple weeks back I shared a link with readers on the Upcycled Stuff Facebook fan page for an organization called Freecycle.  It was a brief encouragement to consider donating some of the things that you might be tossing out during your spring cleaning to someone else who might be able to use it.  Well, I had a really interesting Freecycle moment this week that made me think this whole Freecycle movement might be blogworthy.

My latest Freecycle ask
Freecycle is an amazing community of people across the country who form smaller community groups to share their unwanted goods and find things that they need.  It is a grassroots effort to share perfectly good stuff within a community and keep it out of the landfill.  It's completely free and each community has local volunteer moderators.


Made from an olive jar
This week on my local Freecycle there are people offering up children's clothes, "well loved" furniture, a french drainpipe still in the box (that they found stuck in the tallest parts of a tree after recent windstorms), and much more.  On the other side, people were looking for fans and air conditioning units, moving boxes, a push mower and lots more.  It's true you need to be careful and realize that there are some people who will go ad to ad and take everything they can get their hands on and have a yard sale or put it on craigslist.  It is a bit disheartening when you see people from abuse shelters asking for donations for the families they serve and then you have takers who are just trying to make a buck.  I just try to remember, it's not going into the landfill.  But I digress.

This takes us to my Freecycle moment.  I put up an ask early this week for people's trash. Yup, you don't see too much of that but that's all I ever ask for.  This time it was for aluminum cans and glass food jars for a project I'm working on. As typically happens, I got a lot of responses asking what on earth I'm going to do with it all. I've sprinkled some of the pics of my projects throughout this post.

Go Clemson Tigers!
One of the women, Debbie, who responded to my plea didn't have the items I requested but told me she'd be happy to collect them for me as she used them.  We started chatting and one thing led to another and I ended up collecting a TON of packing materials from her.  She had just moved and was happy to pass on some small boxes and padding for shipping.  Here's the story I love!  The packing paper that I collected from her originated in Puerto Rico when another freecycler moved from there to Florida.  It was passed on to Debbie for it's most recent move from Florida to South Carolina.  Now I will use it to ship product all over the country.  Hopefully, the folks on the receiving end will find some great use for it in a craft project or their own shipping needs. To top it all off, I think there may be a great friendship in the making!  You see Debbie owned her own craft store when she lived in Florida and we had a lot to talk about.

Cute project in progress

That is my Freecycle story and I hope you will give it a chance. Pay it forward and keep it from the landfill!

Sunday, March 20, 2011

Got Envelopes?

Whether you are among the rare breed who still loves to write letters or you're more like me and search frantically for an envelope to mail that once a month bill that you can't pay online, I have the perfect upcycled solution for you!  Origami envelopes made from old magazine pages are an artsy, economical and fun solution to your mailing needs.  Below are two different styles of envelopes that I use to tuck many of my upcycled jewelry pieces in before mailing them out.

And, yes, you can put these directly in the mail for things like letters and cards.  All you need is a label and a stamp and it's ready to mail...you'll probably want to slap on some tape to make sure it stays closed.  I'll give you the best step by step tutorial that a still camera will allow for a very simple upcycled envelope.  But you can find many video tutorials if you search the web.


Start by flipping through your favorite magazines and tear out a page that appeals to you.  Cut the page into a square, the size doesn't matter as long as it is an exact square.   The size of the finished envelope will be approximately half the size of the square you start with.


Take your square and make two diagonal folds.  Reopen the paper, your two folds should form an X and the exact center of the page will be marked by the intersection of those two lines.


 Next, fold in two corners to the center point, like this:


Unfold one of the flaps, keeping the other folded.  Refold along the center fold.  You can start to see your envelope take shape.


Now this is the only part where you can "eyeball it."  You're going to form your sides.  When you fold your sides in, keep in mind that one side will be tucked under the other and you don't want to fold the point back on itself.  Just try to keep the sides folded in the same distance.


Take the top flap and fold it back on itself .  The place that you fold it should match the central fold on the envelope beneath the flap. 


Then stand that point up at a 90 degree angle and open up the triangle.


While holding the triangle open, place your finger on the folded end and squash it down to form a diamond shape.


Now just  fold down the top flap along the previously made fold line.  Run your finger over all of your fold lines a couple of times to make sure everything is crisp.  Then just tuck in your flap and ....


Viola!  Now stop reading this blog and go write some letters.

Sunday, February 27, 2011

The Upcycled Craft Closet

It's definitely been too long since my last post, but I've been busy preparing for it!  My collection of stuff to upcycle seemed to be taking over my entire home.  Since I not only craft from home but also have a full time job working from home I figured it was time to get it under control before I totally lost my mind.  I thought it would be fun to share my upcycled craft room/office/spare room with you. AND, I would love to hear the different ways you organize your craft spaces, so be sure to leave a comment.

After removing the closet doors in my spare bedroom I was able to start really organizing.  Here's what I ended up with:
It all started with a repurposed IKEA shelving unit that once served me beautifully in the living room of my last apartment.  After a few years of use and a cross country move, it definitely needed to find a more discrete use. So, into the closet it went!  While storing the lesser used item in the back of the closet, it's a perfect fit for my newspapers and magazines that will one day become paper beads and so much more.

As you can see, I have cats!  I put several litter buckets to good use; simply slapped on a label, filled 'em up, and neatly tucked them away.  Then when I'm ready to work on a particular type of project I just grab the right bucket and get to work.

Also on the shelf, you'll see some cookie tins that I have labeled and stored things like magazine pages and aluminum that I've already cut but not used in a project.  Those cookie tins were in my basement from the last tenant and they sat there for over a year.  I just couldn't toss them!  They were in pretty good shape but two of them were starting to show signs of rust. Here's the solution I came up, because you know I wasn't going to toss them:

Craft bond is my new best friend, I used it for a few things in this reorganization project.  Here, I took a plastic grocery shopping bag and cut it up to fit the inside of this cookie tin.  I sprayed some craft bond on about a third of the tin wall and attached part of the bag to it.  Then repeated the process until the entire inside was covered.  Now I can store my craft items without worrying about rust transfer.


If we zoom in a little closer, you'll see that I reused the hanging plastic, zippered packaging from some previously purchased bedding.  I stored all my jewelry making tools in one, small patterns that I cut from cereal boxes in another, fabric scraps in still another.  The fourth one is perfect for storing everything that I need for rolling my paper beads.  When I'm headed somewhere that I know I'll be able to get some made (hanging out at mom and dads, waiting on the vet who is NEVER on time, carpool line, etc), I grab the bag and go. They have a built in hanger and I had some empty space where I had removed the clothing bar to allow enough room for the shelving unit so I improvised!  I took some strips of plastic grocery bags and braided them.  This makes for a surprisingly strong rope!  I made a loop at each end and stretched it across half of the closet using the preexisting clothing bar hardware to hang it.  I love these bags!

 Once I was happy with the closet, I turned my focus to the desk area.  This is were I work during the day too so it has to accommodate two jobs.  So here is what I did:
The first thing I did was find the desk!  It was so cluttered over the past few weeks that I was actually working from the dining room table. Once I found it, I got rid of the tchotchkes.  Over the years, I have collected some really beautiful ceramic cup style pieces that were mostly gifts.  They always made it to my desk to hold things like paper clips and rubber bands.  I just knew that I would enjoy them there the most.  But it had become more of a hindrance to productivity so I found new places to enjoy them throughout my home and upcycled something a little more functional.

Using some scrapbooking paper and an empty hot chocolate container, Christmas light boxes and paper towel tubes I created these fun and CHEAP desk/wall organizers.  Those paper towel tubes (hanging on the bulletin board) really helped me get the little trinkets off my desk and house things that I use sometimes but not every day, like rubber bands.  To make these, simply find the appropriate container and spray with mounting glue. Then work your pre-cut paper around the container.  If you'd like to jazz them up and make them last a bit longer you could add a layer of Mod Podge and adorn with ribbons and other jewels.  Check out the desk top organizers in my Etsy store.

Hanging on the wall next to my paper towel tube organizers, I used more of that braided plastic to organize my ribbons and trims.  While my original intention was to just store it in such a way that I could see what I had, it turns out that this is also an easy way to dispense the ribbon.  It just rolls right off the spool when you're ready for it.

And, finally, I added a craft mat that I made from fused plastic bags.  I use a ton of glue and different adhesives with my work so I needed something easy to clean that would protect my work surface.  To stop my beads from rolling off the mat, I sewed down a trim to catch the li'l renegades.  I simply cut up the mesh that my clementines came in and attached it with a zig zag stitch.  Then I used some of that spray mount to add a cork round to the mat.  It is a great place to rest my hot glue gun and to punch my aluminum without poking holes in my desk.

I don't feel like I'm done, but I am in a much happier place and am at peace with my craft room/office/spare room.  I hope you'll find some inspiration to upcycle some organization for your little corner of crafter's heaven.  Don't forget to post your ideas below.

Monday, February 14, 2011

Green Up Your Next Shopping Trip

If there is one thing I've learned in my many many years as a conservationist, it's that it's all about the baby steps.  The human impact on the environment is overwhelming. So overwhelming in fact that some people might be tempted to throw their hands up in the air and think that there really isn't anything they can do to fix it.  I have to disagree, every little contribution you make equals a big difference when it is combined with the little changes that your neighbors make.  Here are some simple tips that you can incorporate into a typical shopping trip that will help reduce your impact on the environment:

T-shirt Shopping Bag

*  So this first tip isn't at all revolutionary, quite the contrary it's "all the rage" to use your own reusable shopping bags nowadays.  Some folks even make their own out of items headed to the landfill, like the colorful bag pictured to the left.  I actually made this one from a t-shirt and duct tape!  Besides the bags that your groceries are carried home in, you should also consider those extra produce bags.  Do we really need to put our one lemon in a plastic produce bag and then put that into another plastic grocery bag?  Instead, skip the bag for that bunch of bananas and loose produce that really doesn't need it.  Just let the cashier drop it all in one plastic shopping bag...better yet, your own reusable shopping bag.

*  When you're walking down the isles you can make a difference every time you put something in your shopping cart.  It might take some getting used to but once you figure it out, your shopping trips will be a breeze!  Some things to be aware of when you're shopping are packaging, post consumer content, perfumes and dyes. 

In addition to adding more garbage to the landfill, too much packaging adds weight to cargo.  Therefore, using more fuel and costing the end user extra money to ship the product.  So look for products with minimal packaging and skip the individual serving packs.  Instead opt for the regular or bulk size snacks and make your own individual servings at home with reusable containers. The same goes for hand soaps and cleaners, refill your containers instead of buying all new dispensers. Making these little changes can make a big difference without sacrificing your own product preferences and it'll save you money too.


Be on the lookout for products that contain a large portion of post consumer content (it contains some amount of recycled materials).  Whether it is in the packaging or the actual product itself every little bit helps.  Things like recycled paper, paper towels and toilet paper really help to save those old growth forests.  Did you know that the planet looses 27,000 tree EVERY DAY just in the making of toilet paper? 


Unnatural perfumes and dyes harm the environment both in their manufacture and later as they bioaccumulate in our soil and water.  Stick with clear, non-stinky (this IS the technical term for it) products.  If you bore easily and simply must add a little color or aroma stick to natural fragrances and dyes, it's better for your health too.

Most of these issues come up when we shop for cleaning and other household products, I found my green answer in the Method line of products. Why?  As a whole, the company does not test on animals, their packaging (which is minimal) is made from 100% recycled material and is also recyclable, their cleaning agents are non-toxic and biodegradable, and the list goes on.  While this is not meant to be a product endorsement I do encourage you to visit their website for a more in depth look at what types of things you should be looking for when you select your green purchases.

Made from a French Toast Box
*  Now that you know what to look for whilst loading up that shopping cart, consider what you'll do once you get home.  What can you possibly upcycle?  For starters, those pesky plastic bags make great trash can liners for bathroom and other smaller wastebaskets.  And all that packaging?  Resuse what you can, see my blog post on plastics for oodles of tips on what you can do with all those plastic containers. If you're crafty, there's lots you can do with cardboard before you decide to toss it in the recycling bin.  A quick search on youtube and you can even learn how to make cardboard furniture.  But seriously, I use old cereal boxes and the like to make patterns that I can later trace over and over again.  I even started making jewelry from cardboard.

Post below and tell me how you reduce, reuse, recycle or upcycle items from your shopping trips.

Thursday, February 3, 2011

Celebrate National Wild Bird Feeding Month

It's that time of the year!  Food sources are scarce and your local birds are looking for food much harder than they do throughout the rest of the year.  During the month of February the National Bird Feeding Society encourages citizens to not only feed their feathered friends but to provide shelter and water to help them survive one of the most difficult months of the year.

What better way to celebrate this event than with an upcycled bird feeder that you can get the kids involved in too?  Here's a quick tutorial for a homemade bird feeder that will reuse some of that plastic headed to the trash or recycle bin.


For my feeder I chose to start with a grande sized Starbucks cup; always in constant supply and currently not recyclable in my community.  Keep in mind that you can use just about anything that you can get your scissors through (soda bottle, milk jug, etc.).  So be creative, rescue some plastic and some birds!  To get started, cut the vessel of your choice into strips.  Be sure leave a couple of inches at the bottom to form the bowl that will hold your bird seed, like this:


Once you've made your strips you'll bend each strip back individually and secure it to the bottom outer edge of the feeder bowl.  Be as creative as you'd like!  You can punch some small holes in the both the bowl and the strips then  thread through a length of raffia or twine or you can simply use a glue gun like I did:


If you use a glue gun you'll have to hold each piece in place until it is dry before moving on to the next.  Once all of your strips are secure you'll end up with something that looks like this:


Now you just need to feed two pieces of twine or other decorative string through two of the loops that are equal distances from each other:


Tie off the strings and fill the cup with bird seed that will attract your local wildlife:


...and hang it outside, preferable near a water and/or shelter souce.


These cute little feeders are so easy to make and you have so many different containers to choose from you could make a whole garden filled with them!  At least it'll add a little color to the brown (or even snow covered) winter garden in your yard.


Here's another version that you can make from an aluminum can pretty easily. This colorful bird feeder is made out of an Arizona Iced Tea can. I added some beads and decorative wire for the hanger.  Use your imagination and dream up some fun feeders.  Leave a comment and let me know how you designed yours!

Saturday, January 29, 2011

Magazines...Not Just for Reading Anymore!

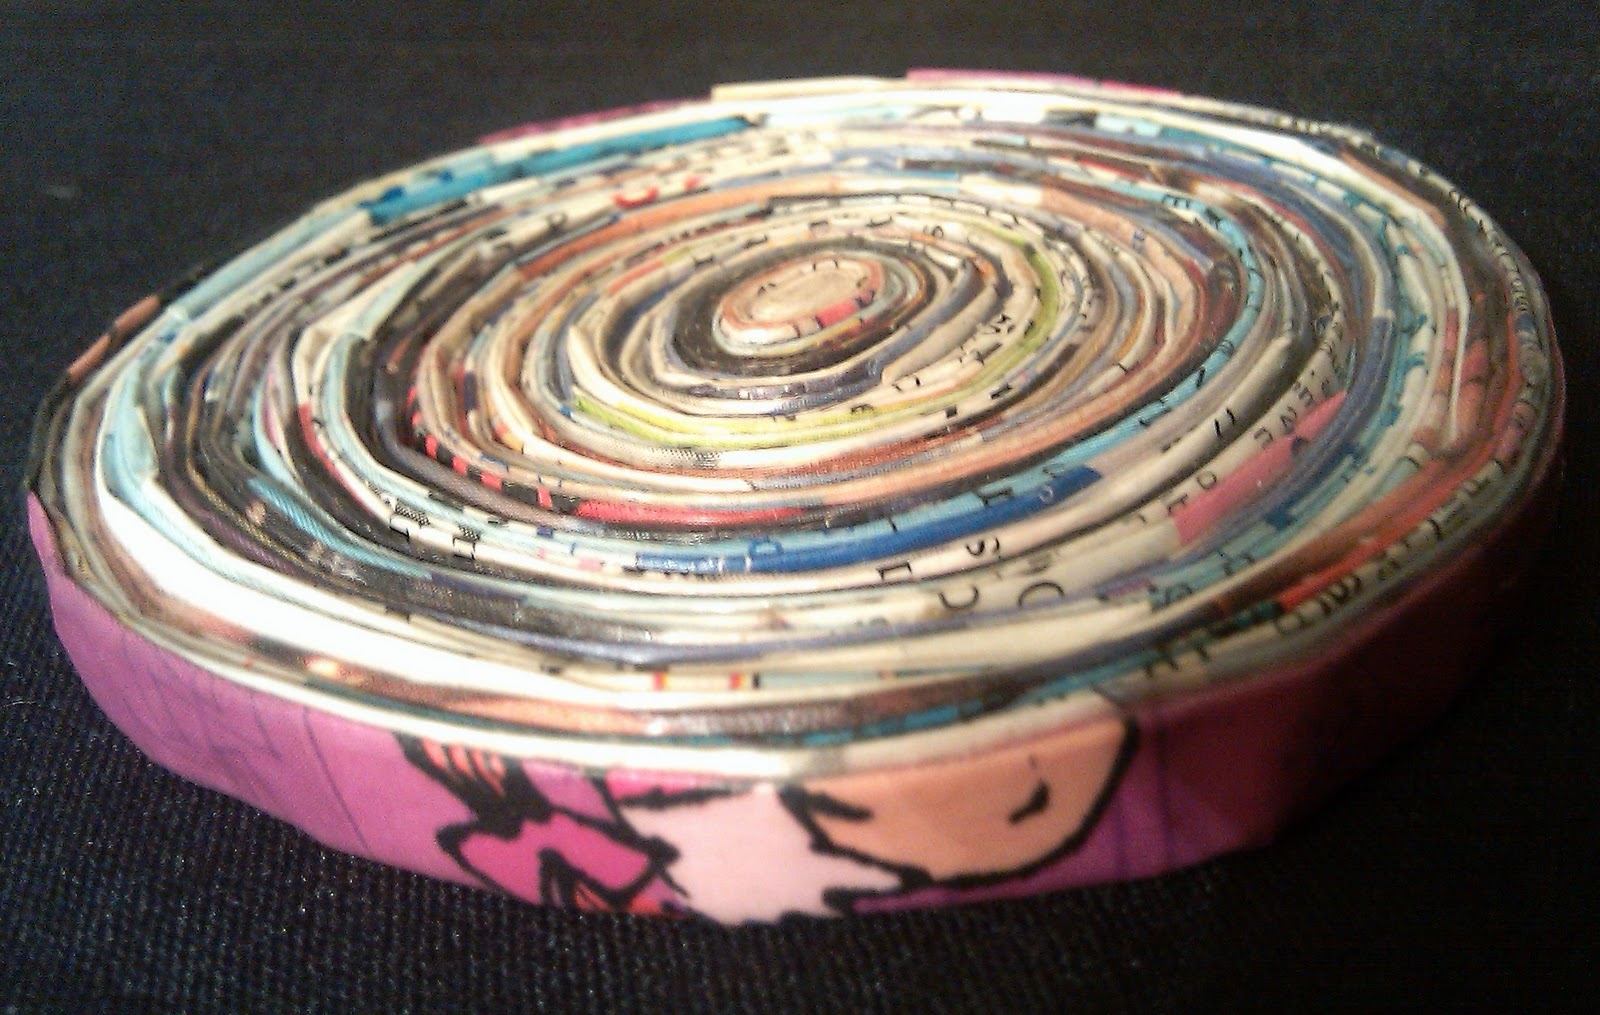
As much as I hate to admit it, there just isn't a digital solution to thumbing through a favorite magazine.  Even I love to look at the beautiful photography and hold the bound pages in my hand.  But more paper and more trees leads me to wonder how to be part of the solution instead of the problem.  I have used the magazines and newspapers in my home to make some beautiful jewelry for my Etsy Shop and this fun tray:


For today's blog I thought I'd show you how to upcycle some of those magazines that are piling up around your home to make this fun and eco-friendly coaster:


Just a word of caution; my first coaster took me three hours to make so allow yourself some time to make these.  This is a great project to do while your watching television.  Before you get started, here's what you'll need:


1.  A couple of magazines
2.  Something to cut the pages with - scissors are okay but if you have one available to you, I highly recommend a paper cutter.
3.  Glue stick
4.  Liquid glue (I used Tacky brand glue)
5.  Mod Podge


First, you'll want to prepare the strips for coiling.  Cut your magazine pages into one inch strips.

Then take a strip and fold it in half the long way.


Unfold the strip and use the fold line as a guide to fold in each side to the center.  You'll want to take caution not to allow the edges to overlap.

Run your glue stick along the folded strip, 

and refold along the first fold that you made.  Repeat until you have MANY skinny strips made!  It takes more strips than you can imagine.

Now it's time to start putting your coaster together.  Take your first strip and run a small (emphasis on small) amount of liquid glue along the strip and start to coil it.

Continue adding (and adding...and adding) strips being careful to line up the end of one strip with the start of the next.  Other artists prefer to overlap the edges of each strip but for this project I do not recommend doing so.  This tends to add gaps to your work, not a desirable trait in a coaster!

Once you have your coaster the size you want it coat the entire thing (one side at a time) with a layer of mod podge.  Add two more layers, more if needed.  Once the coaster is completely cured (approximately 24 hours) it's ready for use. At this point I chose to add a couple coats of a spray varnish.  It just felt like a stronger piece to me but it is not necessary.


There it is, ready to use!  Now repeat this process until you have a full, eco-friendly set of coasters.  Enjoy!

Monday, January 24, 2011

I am an Etsy for Animals Artist

Okay, even I have to giggle a little when I call myself an artist.  It's not one of those careers that ever made it to my What Do You Wanna Be When You Grow Up? list mostly because I just didn't consider myself very artistic.  As it so happens, I am and Etsy for Animals (EFA) artist and I find it just as rewarding as working with animals.

EFA is an amazing group of artisans who peddle their wares for a cause - an animal related cause.  Each charity is self selected and just as varied as the artists themselves.  For example, I have a long history of working with primates, chimpanzees especially.  So every time I make a sale in my Etsy shop I donate 10% to the Jane Goodall Institute to help them continue their efforts in protecting habitat, rescuing orphaned chimps and other conservation efforts.  You'll find plenty of other organizations supported by EFA artists who help every kind of animal  from cats and dogs to llamas and tapirs.

To see other artists who are supporting animal causes that are meaningful to them check out the list in my blog sidebar (to the left).  This certainly isn't a complete list but it's a good place to start. Happy shopping!
Related Posts Plugin for WordPress, Blogger...