Pages

Wednesday, March 19, 2014

How to Make Garden Edging From Pallet Wood

I was pretty tickled with the way this rustic garden edging turned out.  I was even more tickled that I made it from pallet wood and soda bottles!


I made this garden edging as part of a mailbox makeover for my parents 44th wedding anniversary. Be sure to check out the before and after if you missed it. I used wide strips of 2-litter soda bottles to connect 4-plank sections of pallet fencing.  Nine inch lengths of metal dowels were inserted into two planks of each section and hammered into the ground.  It really was as easy as that, you can check out my YouTube channel to see the full tutorial.

Wondering if you have the tools to complete the job?  Here are some that I think would be helpful.


Disclaimer:  While this post contains affiliate links, these are the products that I have previously purchased and regularly use in my craft room.  I do not receive compensation for my opinion, however, I do receive a few pennies commission if you decide to purchase these products through Amazon. More pennies equals more tutorials, thank you for your support!

Sunday, March 16, 2014

A Mailbox Makeover

Not to rub it in for all of my neighbors to the North, but I planted flowers nearly two weeks ago.  Yep, blooming, colorful spring flowers.  It was part of a desperately needed makeover to my parents mailbox area.  It was their 44th wedding anniversary gift.  Check out this before shot:


Now keep in mind, everything is still a bit scraggly because it's not quite Spring yet.  In the summer time that Jasmine is robust with bright yellow flowers.  However, it's all too much.  It's overgrown and (God love him) my dad "prunes" with a weed wacker. So, I knew that no matter what else I did here, that jasmine had to go.  Thankfully, mom agreed.  So out came the Hitachi CR13V2 10-Amp Reciprocating Saw AKA, the
sawzall! 

When figuring out my plan of attack, I wanted to avoid having the utilities come out and mark the underground wires...because I procrastinated and needed to get it done.  What else is new!  So I decided on a somewhat raised bed around the mailbox.  Check out what I made with some old pallet wood and soda bottles, yep, soda bottles. 


Before I did all that though, the mailbox and post needed some work!  Here's a better look:


Forget about all the rust and peeling paint, the hardware is MANGLED.  Looks like it's time for a new mailbox!  HA, I don't think so.  I simply removed the four screws holding the mailbox to the post and the 6 nuts and bolts holding the hardware on and blasted it with some spray paint.  As for the hardware, well that was straightened simply with a little muscle and a rubber mallet.

Besides the fact that the numbers were completely obscured by the jasmine, there were also numbers missing.  I knew I could come up with something better, handmade and upcycled!  Check out the house number plaque that I carved from a piece of pallet with my Dremel:

Now, just add flowers!


Which one do you like better?


See the complete details on how to make:

Garden edging made from pallet wood and soda bottles

Wednesday, March 12, 2014

How to Make a Layered Soda Can Flower Embellishment

For those of you still dealing with temps in the 20's and 30's, I apologize in advance for the next several posts.  We've had two nice weekends in row here in the South (nice enough to paint even!) and I've been gardening!  Yes, gardening.  I'll have a few posts over the next couple of weeks to show you what I've been working on.  For now, how about if we get started with some indoor projects that will make it feel like Spring is here!

I've been making and selling little aluminum embellishments in my Etsy shop for a couple of years now and I just love them.  My customers have come up with some really great ways to use these pieces in their own projects, too.  One of them used these butterflies to make napkin rings and I've used them to make both Christmas tree ornaments and have even added a metal stake to use as garden decoration.


And these adorable tiny flowers were made from the UPC symbol section of soda cans.  One of my customers incorporated them into her jewelry creations.


Today I'm going to show you how to make your own layered soda can flower embellishments.  I've used these flowers as embellishments for gifts but I think they'd be great on handmade cards, too.  And many of my customers have used these as Christmas tree ornaments as well.  Be sure to check out the video tutorial, then tell me how you'll use them!

Want to see what tools I used?  Here are links to the products on Amazon:


Disclaimer:  While this post contains affiliate links, these are the products that I have previously purchased and regularly use in my craft room.  I do not receive compensation for my opinion, however, I do receive a few pennies commission if you decide to purchase these products through Amazon. More pennies equals more tutorials, thank you for your support!

Sunday, March 9, 2014

A St. Paddy's Day Craft for You and the Kids

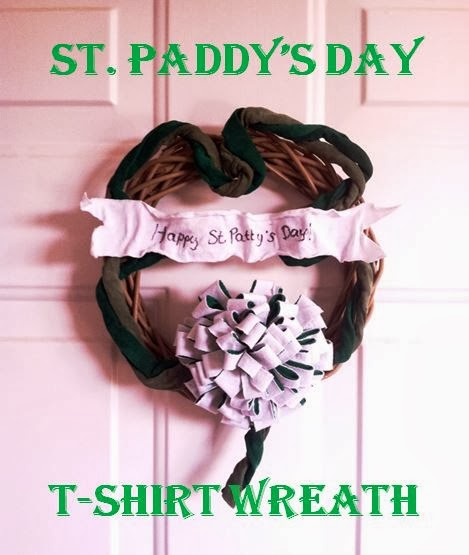
So, I found a fairly lack-luster country style wreath in the thrift store for a dollar.  Definitely not my style and in desperate need of an update.
So, I grabbed a can of spray paint and a couple of T-shirts.  Here's what I came up with:


Did you catch the spelling error? You know how it is when you spend the better part of a weekend working on a project, shooting video for a tutorial and then go through the editing process only to realize that you made a spelling error on the actual project that you can't fix it without starting all over?  Yeah, that was my weekend so I decided to just live with it. 

I love this project for kids, but that doesn't mean you can't enjoy it too.  To make a similar wreath, you'll need to know how to make T-shirt yarn and T-shirt flowers.   You can find instructions for both projects on my YouTube Channel. The Shamrock shape and banner were also made from T-shirt but I used a bit of fabric stiffener to shape them.  Be sure to check out the video for all the step-by-step instructions.


Monday, March 3, 2014

How to Make a Drawstring Pouch from a T-shirt Sleeve

Happy National Craft Month!! Who's ready for another T-shirt craft?  These are simplest bags (pouches) you'll ever make and they are made from thrifted T-shirt sleeves.  I make them by the boat-load and use them to package up shoppers purchases when I'm working an Art Festival or Farmer's Market. But you can certainly make just one for that something special that you need to wrap.  You will need a sewing machine and scissors but everything is constructed from T-shirts.  Come see how I make these over on YouTube.


Thursday, February 27, 2014

How to Make a 3D Fringed Flower from a T-shirt

I love these 3D flowers made from thrifted T-shirts and I'm going to show you how easy it is to make them!

First, a confession.  I saw someone do a fringed T-shirt flower tutorial a few weeks ago and took a mental note so I could go back and give it a try.  And when I lost that mental note and couldn't find the original tutorial, I tried to do it myself. Needless to say, this is not what her flowers looked like.  They were a great deal flatter and I'd still like to give it a try. So, if you know the tutorial I'm talking about PLEASE leave a link in the comments.

I made a quick little video tutorial to show you how I made these flowers.  You can find it here.  So gather up your supplies; an old T-shirt, fabric glue and a pair of scissors and join me.  And stay tuned because I have an idea or two for using these flowers in other projects.

Sunday, February 2, 2014

What You SHOULD Be Upcycling: T-shirts

ELEVEN MILLION TONS OF CLOTHING END UP IN LANDFILLS EACH YEAR! Are you as mortified as I am?  And did you know that two billion T-shirts are sold annually around the world?  Ladies, I think it's time we let the men keep their T-shirts...no matter how many they own.  

There is an interesting history to the T-shirt and it turns out that my favorite movie of all time, The Wizard of Oz, plays a hefty hand in it. While the word T-shirt became an official American-English word when it made its debut in the Merriam-Webster Dictionary in 1920, it was in 1939 when the first promotional T-shirt made its debut, for the Wizard of Oz.  Its popularity as a outer-wear garment, however, didn't catch on until Marlon Brando wore one in A Streetcar Named Desire in the 1950s.  And now....we're at 2 billion annually!

That 2 billion T-shirts translates to 800 billion gallons of water each year...just to grow the cotton required to make them.  JUST FOR T-SHIRTS, nevermind the jeans that you're going to wear with them!  As an avid thrifter, I can tell you that we waste so many resources on nonsense T-shirts.  Yes, I said nonsense!  Let me ask you, have ever had a large family reunion or company retreat and been given a T-shirt to wear for the day?  I see them all the time at the thrift store and they are not cute, not something that you'll ever wear again. 

T-shirts have quickly (and sadly) become disposable in our society.  So, I'm on a mission.  A mission to free the landfills of the world of the perfectly usable textiles that are smothering them.  And I'm going after the T-shirt (to start with)!  So raid your hubbies closet (or yours) or head out to the thrift store and snatch up some of those beauties and let's get started.

You've heard of T-shirt Yarn, right?  Well, if not, I've whipped up a little T-shirt Yarn Video Tutorial to show you how quick and easy it is to make.  And I've been hard at work developing new craft projects that will allow you to use T-shirt Yarn while never picking up a crochet hook or knitting needle. I just posted my first project and hope you'll check out my Finger Knit, Beaded T-shirt Yarn Bracelets.  


Be sure to subscribe to my YouTube channel while you're there so you don't miss a single project.


Related Posts Plugin for WordPress, Blogger...